Tag Archives: Holiday Cookies

{ Italian Florentine Cookies }

Florentine

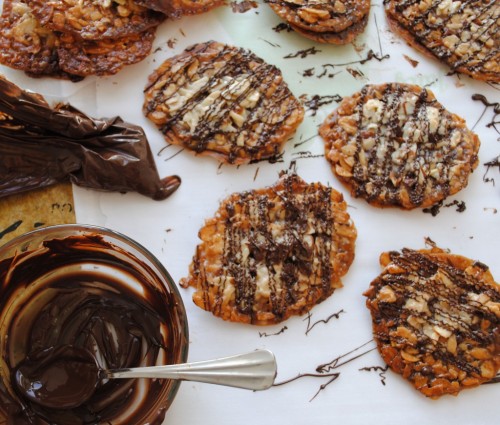
Last week I blogged my recipe for Italian seven-layer cookies, and this week I am sharing my recipe for another classic Italian Christmas cookie: Almond Florentines. Also known as lace cookies, Florentines are an extremely delicate, paper-thin cookie made of macerated almonds and orange zest. They are crunchy and sweet, and with the chocolate drizzle on top–optional in this recipe, but a must for me!–they are absolutely decadent.

I like to make these for the holidays because other people so often gravitate towards making softer dough cookies like sugar cookies, spritz cookies, and snickerdoodles. Baking something with a little crunch factor helps to set you apart from the other women at the neighborhood cookie exchange!

{ Ingredients }

  • 1 3/4 cups sliced, blanched almonds (about 5 ounces)
  • 3 tablespoons all-purpose flour
  • Finely grated zest of 1 orange (about 2 tablespoons)
  • 1/4 teaspoon fine salt
  • 3/4 cup sugar
  • 2 tablespoons heavy cream
  • 2 tablespoons light corn syrup
  • 5 tablespoons unsalted butter
  • 1/2 teaspoon pure vanilla extract

Chocolate Topping, optional:

  • 2 to 4 ounces semisweet chocolate, chopped

{ To Make the Italian Florentine Cookies }

Position a rack in the center of the oven and preheat to 350 degrees. Line a baking sheet with parchment paper.

Pulse the almonds in a food processor until finely chopped, but not pasty. Stir together the nuts, flour, orange zest, and salt in a large mixing bowl.

Put the sugar, cream, corn syrup, and butter in a small saucepan. Cook over medium heat, stirring occasionally, until mixture comes to a rolling boil and sugar is completely dissolved. Continue to boil for 1 minute. Remove from heat and stir in the vanilla, then pour mixture into almond mixture and stir just to combine. Set aside until cool enough to handle, approx. 30 minutes.

Scoop rounded teaspoons (for 3-inch cookies) or rounded tablespoons (for 6-inch cookies) of batter and roll into balls. Place on prepared baking sheet, leaving about 3 to 4 inches between each cookie since they spread (and trust me, they do!!!).

Bake 1 pan at a time, until the cookies are thin and an even golden brown color throughout, rotating pans halfway through baking time, about 10 to 11 minutes. Cool on baking sheet for 5 minutes, then transfer to racks to cool. Repeat with remaining batter. Serve.

{ MUST HAVE  Chocolate Topping Drizzle }

Set up a classic double broiler system by putting the chocolate in a medium heatproof bowl. Then bring a saucepan filled with 1 inch or so of water to a very low simmer; set the bowl of chocolate over the saucepan so that it is just above, but not touching, the water. Stir the chocolate occasionally until melted and smooth.

Chocolate in a double boiler

Drizzle melted chocolate over Florentines as desired. Set aside at room temperature until chocolate is set.

Florentine-Cookies-40-1024x871

**Store baked cookies carefully, separated by parchment or waxed paper, in an air-tight container for up to 3 days. Florentines are best stored separated from moist cookies and cakes.

IMG_0444

Leave a comment

Filed under Baking, Cookies, Dessert, Recipes

{ Italian Seven Layer Cookies }

IMG_0474edited

I come from a long lineage of family bakers. Cream and sugar are literally coded in my DNA.

And when I was growing up, the holidays signified one thing: cookie season! I would come home from school and my mom would have magazine clippings for cookie recipes that she wanted to try out at one of her infamous cookie exchanges. Given that it was not warm enough to play outside, she would encourage my sister and I to help her sift the flour, roll out the dough, and dip/glaze/sprinkle the tops of cookies in an effort to keep us from turning on the television (or the ‘boob-tube’ as it was referred to in my house!). Of course, we were always more more than happy to oblige!

We would make dozens of spritz cookies, sugar cookies, gingerbread cookies, chocolate chip cookies, pecan tassies, mixed nut turtles, and traditional Hungarian kiffles. But the one cookie we never made, was ironically the one that was my favorite–the Italian seven layer cookie.

Whenever I would spot these in a party tray assortment, I would pick them out, stuff them in a napkin, and then scurry away to eat them by my lonesome. I was–and still am–an Italian cookie fein and hoarder.

This year, I decided to make my own seven layer cookies using the recipe printed in Gourmet, December 2005, and since them endorsed by The Smitten Kitchen food blog. I will admit that they were quite laborious and involved to make, but since they can be frozen in large blocks, I will have them to enjoy/gift over the next few months (or weeks, depending on my level of self-control!).

3114755998_69d8f2f352

{ Ingredients }

  • 4 large eggs, separated
  • 1 cup granulated sugar
  • 1 (8 oz) can of almond paste
  • 2 1/2 sticks of unsalted butter, softened
  • 1 teaspoon almond extract
  • 2 cups all purpose flour
  • 1/2 teaspoon salt
  • 25 drops red food coloring
  • 25 drops green food coloring
  • 1 (12 oz) jar of apricot preserves, heated and strained
  • 7 oz of good-quality bittersweet chocolate (not unsweetened), roughly chopped

{ To Make Italian 7-layer Cookies }

Place oven rack in middle position and preheat oven to 350°F. Butter a 13- by 9-inch baking pan and line bottom with wax paper, leaving a 2-inch overhang on two of the ends, then butter paper.

Beat egg whites in mixer fitted with whisk attachment at medium-high speed until they just hold stiff peaks. Add 1/4 cup sugar a little at a time, beating at high speed until whites hold stiff, slightly glossy peaks. Transfer to another bowl.

Switch to paddle attachment, then beat together almond paste and remaining 3/4 cup sugar until well blended, about 3 minutes. Add butter and beat until pale and fluffy, about 3 minutes. Add egg yolks and almond extract and beat until well combined, about 2 minutes. Reduce speed to low, then add flour and salt and mix until just combined.

Fold half of egg white mixture into almond mixture to lighten, then fold in remaining whites gently but thoroughly.

Divide batter among 3 bowls. Stir red food coloring into one and green food coloring into another, leaving the third batch plain. Set the white batter aside. Cover the green batter with plastic wrap and chill in fridge.  Pour the red batter into the prepared pan and spread evenly with offset spatula (layer will be about 1/4 inch thick).

Bake red layer 8 to 10 minutes, until just set. (It is important to undercook. They’ll look like they’re not done, but a tester does come out clean.)

Using the paper overhang, transfer the layer to a rack to cool, about 15 minutes. Clean pan, then line with parchment or wax paper and butter paper in same manner as above. Bake white layer in prepared pan until just set. As white layer bakes, bring green batter to room temperature. Transfer white layer to a rack. Prepare pan as above, then bake green layer in same manner as before. Transfer to a rack to cool (see note #1).

When all layers are cool, invert green layer onto a parchment or wax-paper-lined baking sheet. Discard paper from layer and spread half of the apricot preserves on top. Invert white layer on top of green layer, discarding paper. Spread with remaining apricot preserves. Finally, invert the red layer on top of white layer and discard wax or parchment paper (see note #2).

3111716910_857db7beb1_m

Cover entire “layer-cake” with plastic wrap and weight down with a large baking pan (I stacked cook books on mine for extra weight!). Chill for at least 8 hours. BE PATIENT!

3110888019_5cedcfe6d8_m

Remove weight and plastic wrap. Bring layers to room temperature. Melt chocolate in a double boiler or a metal bowl set over a saucepan of barely simmering water, stirring until smooth. Remove from heat. Keep chocolate over the hot water.

Trim edges of assembled layers with a long serrated knife so they are clean lines. Quickly spread half of chocolate in a thin layer on top of cake. Chill, uncovered, until chocolate is firm, about 15 minutes. Cover with another sheet of wax paper and place another baking sheet on top, then invert cake onto sheet and remove paper. Quickly spread with remaining chocolate. Chill until firm, about 30 minutes.

Cut lengthwise into desired number of strips, depending on the size and number of cookies that you want to yield. I cut mine into 10 I believe.   Cut strips crosswise into 3/4-inch-wide cookies  (see note #3).

**Do ahead: Cookies keep, layered between sheets of wax paper or parchment, in an airtight container at room temperature 2 weeks. They’ll keep even longer in the freezer.

Three important notes:

Note #1Don’t stack the cakes during the cooling process: Not because they crush each other (they won’t) or because they’ll stick (they don’t), but because that paper liner is greased on both sides from baking and the chocolate shell won’t quite stick right to exterior of the red layer because of the grease accidentally left on it.

Note #2Be careful dividing your jam: If there is too much jam between one of the layers, it will ooze out when you cut the cake with a serrated knife. Sadly, the cookie will fall apart.

Note #3They’re easier to cut when frozen: Nevertheless, they tasted amazingly and I was all ready to do a victory lap around my wee kitchen counter, however, when I got to cutting them up and then it all went south. People, these were trying to cut. The problem lies within the differing textures of the layers — the top hard chocolate shell more benefits from a sharp serrated knife (a regular, even very sharp knife will crack the edges when you press down on it), the same serrated knife that gets gummed with jam and tries to pull the soft cake layers in between apart. It was exasperating. It didn’t go well. I packed up some for a party and stuffed the rest in the freezer, only to discover the next day that these cut fantastically when frozen. Seriously. Trust me. I have the gummy floor and gray hairs to prove it.

3114754008_186ca63709

5 Comments

Filed under Baking, Cookies, Dessert, Holiday Recipes, Recipes

{ Chocolate Chip Cookie Throwdown! }

Jacques Torres Chocolate Chip Cookie
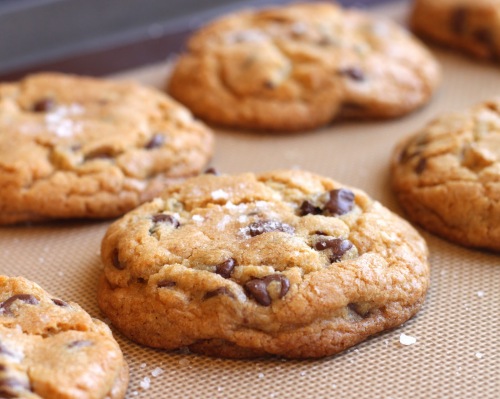
When The New York Times published the recipe for their favorite chocolate chip cookie, shit hit the fan…..in the food blogging world, at least!  It was like everyone instantaneously took out their kitchen aid mixers and got to baking and blogging. Post after post on my RSS feed featured reviews commenting on the cookie’s flavor, texture, and composition. Bakers and cookie connoisseurs alike disputed in blog columns whether or not this recipe was actually the best, and then offered their comments/suggestions to make it even better. With all this sugary hype, I  knew that I would just have to try the recipe out for myself. And being the type A, OCD freak that I am, I decided that I would also give a go at two of the other recipes suggested as contenders for the title of best chocolate chip cookie: (1) Jacques Torres’ Original Chocolate Chip Cookie Recipe & (2) blogger, “Will Bake for Tattoos'” Chocolate Chip Cookie Recipe.
Chocolate Chip Cookie Batches
So with three types of freshly baked chocolate chip cookies before me, which cookie recipe proved victorious?!?
Cookies Baked
Jacques Torres Chocolate
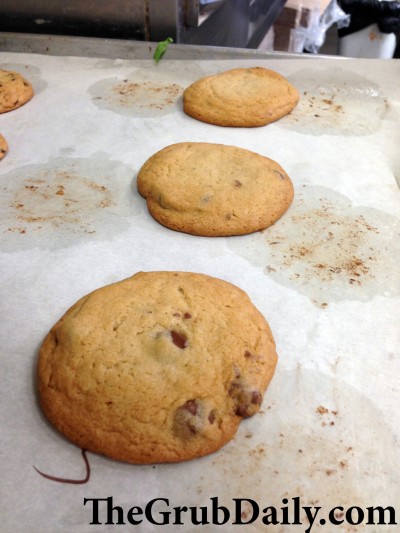
The New York Times recipe (#1 on the baking sheet) is a modified version of this classic (and it was a close second place), but the texture was uniform throughout the cookie. I liked that Jacques’ recipe  (#2 on the baking sheet!) had a crispier edge with a softer/chewier center.
NY Times Choc. Chip
The “Will Bake for Tattoos'” Recipe (#3 on the baking sheet) was far too commercial tasting in my opinion; it had a very “cakey” texture as opposed to a chewy texture, and the sugar in the cookie never caramelized to create a golden rim around the edge.
Will Bake for Tattoos
One thing that I did for all of the cookies, was allow them to chill in the refrigerator over night. The New York Times published an article in 2008, stating that the secret to a perfect chocolate chip cookie was to let it chill for a minimum of 24 hours, and ideally for 36 hours! I made sure to plan ahead (a rarity), and prepared my dough 24 hours in advance of baking to get the maximum quality out of the doughs.
Without further ado, here is the recipe for Jacques Torres Chocolate Chip Cookies:

{ Ingredients }

  • 1 pound unsalted butter
  • 1 3/4 cups granulated sugar
  • 2 1/4 cups packed light-brown sugar
  • 4 large eggs
  • 3 cups plus 2 tablespoons pastry flour
  • 3 cups bread flour
  • 1 tablespoon salt
  • 2 teaspoons baking powder
  • 2 teaspoons baking soda
  • 1 tablespoon pure vanilla extract
  • 2 pounds bittersweet chocolate, coarsely chopped

{ Directions }

Preheat oven to 350 degrees. Line baking sheets with parchment paper or nonstick baking mats; set aside.

In the bowl of an electric mixer fitted with the paddle attachment, cream together the butter and sugars.

Add the eggs, one at a time, mixing well after each addition.

Reduce the speed to low and add both flours, baking powder, baking soda, vanilla, and chocolate; mix until well combined.

Using a 4-ounce ice cream scoop, drop the cookie dough onto the prepared baking sheets, about 2 inches apart.

Bake until lightly browned, but still soft, about 20 minutes.

Cool slightly on baking sheets before transferring to a wire rack to cool completely.

3 Comments

Filed under Baking, Recipes

{ Pumpkin Chocolate Chip Cookies }

I was really sad about missing Thanksgiving dinner this year. Sad to the point where I dreamt about rosemary-infused stuffing, cranberry condiments, and golden-glazed turkey long after the holiday had passed. These thanksgiving “accruciaments” (as Tony Soprano would say) are all obsolete in Argentina, a country that is recognized for both its prized bovine and lack of importation. The only cans of cranberry sauce and pumpkin puree to be found, were in the possession of foreign service agents that had “special postal privileges.” There was literally a black market among BA expats for gravy starter and Sarah Lee products. Unfortunately, my measly teaching salary did not afford me one of these luxury canned items (I will never look at a food-drive the same way again), and so I resorted to a chicken stir-fry on Thanksgiving evening.

For a foodie like myself, this is a crime because Thanksgiving is unequivocally the best day of the year–a day where we are finally accompanied by family and friends in our passion for food and the desire to consume exorbitant amounts of it. So to miss such a momentous event…well, it’s downright depressing. So my family decided to have Thanksgiving round #2. They say it was just for me, but how many people really keep a spare Butterball in their freezer?!? A 16 pound one no less…

We made all of our Thanksgiving family favorites; starting with a juicy Lemon-Herb Roasted Turkey, accompanied by Roasted Garlic Mashed Potatoes, Lemon-Scented Broccoli, Rosemary and Sage Infused Stuffing, Corn, and my mom’s delicious Homemade Gravy!

But it wouldn’t be a proper Thanksgiving feast without some sort of pumpkin-flavored dessert, so my sister and I decided to try out Paula Deen’s recipe for Pumpkin Chocolate Chip Cookies (although we made some modifications, as one must with Paula Deen’s butter rich recipes!).

Overall, I thought the cookies had a really great flavor but they were more cake-like than cookie in composition. If you are a fan of soft cookies, then you will love these!! I would probably opt for my Pumpkin Spice Cupcakes with Cream Cheese Frosting in the future though, because I like crunchy cookies instead.

{ Ingredients }

  • 1 cup (2 sticks) unsalted butter, softened
  • 1 cup white sugar
  • 1 cup brown sugar, packed
  • 2 large eggs
  • 1 teaspoon vanilla extract
  • 1 cup canned pumpkin puree
  • 3 cups all-purpose flour
  • 2 teaspoons baking soda
  • 1/2 teaspoon salt
  • 2 teaspoon ground cinnamon
  • 1 teaspoon ground ginger
  • 1/2 teaspoon ground nutmeg
  • 1/2 teaspoon ground cloves
  • 2 cups (1 12-ounce bag) semisweet chocolate chips
  • Nonstick cooking spray or parchment paper
{ To Make the CookiesPreheat the oven to 350 degrees and prepare a cookie sheet with parchment paper or nonstick spray.
Using a mixer fitted with a paddle attachment, beat the butter until smooth. Beat in the sugar, whisking until light and fluffy.
Add the eggs 1 at a time, then mix in the vanilla and pumpkin puree. Scrape down the sides of the bowl, until everything is well combined.
In a separate mixing bowl, whisk together the flour, baking soda, salt, cinnamon, ginger, nutmeg, and cloves.

Slowly add the flour mixture to the wet mixture in 3 parts, and continue to mix on a low speed until well combined. Stir in the chocolate chips and drop cookies onto prepared cookie sheet. NOTE: I like to use a small ice cream scoop so that the cookie batter is evenly distributed!

Place the cookie sheet into the oven and allow to bake for 20-25 minutes, or until the tops are golden brown. Allow to cool and serve!

Leave a comment

Filed under Baking, Recipes

{ Pecan Tassies }

As I have mentioned several times on blog, I am not particularly keen on sweets. Given the option, I would always prefer to gorge more “real” food, rather that save myself for a dessert. This being said, I am a major proponent of one-bite desserts that let you have a little taste without a full dessert commitment. Something small that you can just pop in your mouth and be done with in seconds (not an obnoxious slice of cake that you have to try to pawn off to everyone around you, before finally stashing it under a pile of napkins in the hostess’s garbage can….hey, we’ve all done it).

These pecan tassies are a perfect dessert for holiday meals, because you can always find room for at least one, no matter how much you have already eaten.  My mom makes this recipe every year, and finds that they are always well received at the annual cookie exchange (a nice switch-up from the santa sugar cookie cutouts!).

This recipe is low cost, straight forward, and delicious. Try it out this Christmas!

{ Ingredients }

  • 2 sticks unsalted butter
  • 2 ounces cream cheese
  • 2 cups all-purpose flour (King Arthur is best)
  • 1 1/2 cups brown sugar
  • 2 tbsp. melted butter
  • 2 eggs, beaten
  • 2 tsp. vanilla extract (Madagascar is best!)
  • 1 1/2 cups chopped pecans
  • 1 tsp. honey
  • dash of salt

{ To Make the Dough Cups } Using an electric hand mixer on medium speed, cream together the 2 sticks of butter and the cream cheese until light and fluffy. Then mix in the flour, until well combined.

Using your hands, roll the dough into about 48 small balls. Place the balls into a small, lightly greased muffin pan. Create small wells in the dough, using the pressure of your thumb (remember, the well must be large enough to contain the pecan filling).

{ To Make the Pecan Filling } Combine the brown sugar, melted butter, honey, vanilla extract, salt and eggs. Stir until well combined. Add the chopped pecans and mix to coat.

{ To Assemble the Tassies } Preheat the oven to 400 degrees.

Spoon the pecan filling into the wells of the dough cups, until all of the filling has been used up.

Bake the tastes at 400 degrees for 15 minutes and then reduce the heat 250 for the final 10 minutes of baking.

Remove from oven and allow to cool. Sprinkle with powdered sugar just before serving!


2 Comments

Filed under Baking, Recipes

{ Hungarian Cream Cheese Cookies – Kiffles }

When I was growing up, the the holidays were marked by my Hungarian grandmother’s homemade cream cheese cookies (or Kiffles, as they are called in Hungarian). They would make their first appearance on Thanksgiving, and then she would continue to bake them until Christmas day. I couldn’t get enough of these little cookies, eating them by the plateful (and always getting caught because of the powdered sugar trail I would leave behind).

A kiffle is a moist and delicate pastry dough filled with lekvar (tart prune) or apricot preserves. This year, I have decided to continue the family cookie tradition here in Buenos Aires by making my great grandmother’s original recipe (yes, this is it). It is a simple recipe to make because only a few ingredients are required and no “special equipment” is needed!

NOTES: It is very important that you be patient and allow the ingredients to properly soften before beginning, or the dough will not come together right. Also, I suggest using King Arthur flour in this recipe because it is the best flour for baking. Since the dough is composed of so few ingredients, it is really important those those couple be of a very high quality. Splurge on the King Arthur if you can, but the recipe will work if you can’t find it (I couldn’t here in Argentina, and my cookies still came out fine).

{ Ingredients }

**Makes about 48 cookies

  • 1 stick of unsalted butter, softened
  • 1 stick of margarin, softened
  • 1 (8 ounce) package of Philadelphia cream cheese, softened
  • 1 tablespoon vanilla extract
  • 3 1/2 cups King Arthur flour
  • Lekvar or apricot preserves
  • Confectioner’s sugar

{ To Make the Cookies } Preheat the oven to 350 degrees.

Using and electric mixer on medium speed, cream together the softened butter, margarin, and cream cheese. Add the vanilla extract and continue to mix until light and fluffy.

IMG_0726

Add 3 cups of flour and mix with hands. The dough should be smooth but not sticky. If it is too sticky, continue to add flour until the right consistency is achieved. Divide the dough into four balls, cover in plastic wrap and put in freezer for 20 minutes.

IMG_0730

IMG_0720

Using a rolling pin, roll out the dough on a lightly floured surface and then cut the dough into small squares. Place a dollop of lekvar or apricot preserves in the center of the square and then bring two of the opposing dough corners together atop it.

Arrange cookies on a baking sheet lined with parchment paper and allow to bake for 7-8 minutes, or until the edges are golden brown. Remove from the oven and let cool.

Sprinkle with powdered sugar and serve!

27 Comments

Filed under Baking, Recipes