Category Archives: Baking

{ Slate Bleu } ***

Escargot en Croute
100 South Main Street
Doylestown Pa 18901
215.348.0222

CHECK OUT THE MENU!

My friend Liz and I constantly find ourselves asking the question, “where should we go for dinner tonight?” We live in a small town with fairly limited dining options, which leads us to frequent the same four places over and over again each week: Domani Star, Ooka, M.O.M.s, and Quinoa. But tonight we were longing to break out of our little routine so we ventured to try the French restaurant Slate Bleu.

It is by no means new to the neighborhood—if fact, it has established a sort of cult following—but it always falls of my radar because its location is slightly hidden. Out of sight, out of mind, I guess.

Tonight we arrived without a reservation and found ourselves seated without a problem in the elegant downstairs dining area (I prefer this downstairs bar area to the upper tier dining room, which is a bit more removed from the pulse of the restaurant). The décor is very chic and modern, and lends itself well to an impressive first-date kind of place.

After looking over the cocktail list, I decided to try the Bourbon St. Ginger on the rocks, made with Elderflower liquor, bourbon, and a splash of ginger ale ($9). The slight fizz was refreshing, but the drink was definitely potent. I also recommend the Frozen Grapefruit Martini made with absolut vodka, dry vermouth, sorbet, and grapefruit segments ($13). It is certainly pricey, but so unique and delectable that it can commend the price point.

To start we ordered the Salade Ardoise with mixed greens, figs, French bleu cheese, Prosciutto, pecans, and balsamic vinaigrette ($12.50). We had the intentions of sharing the salad, but ordered a second to each have our own after the first bite! The bleu cheese was excellent and the figs were so good with the salty ham and vinegar.

IMG_3742

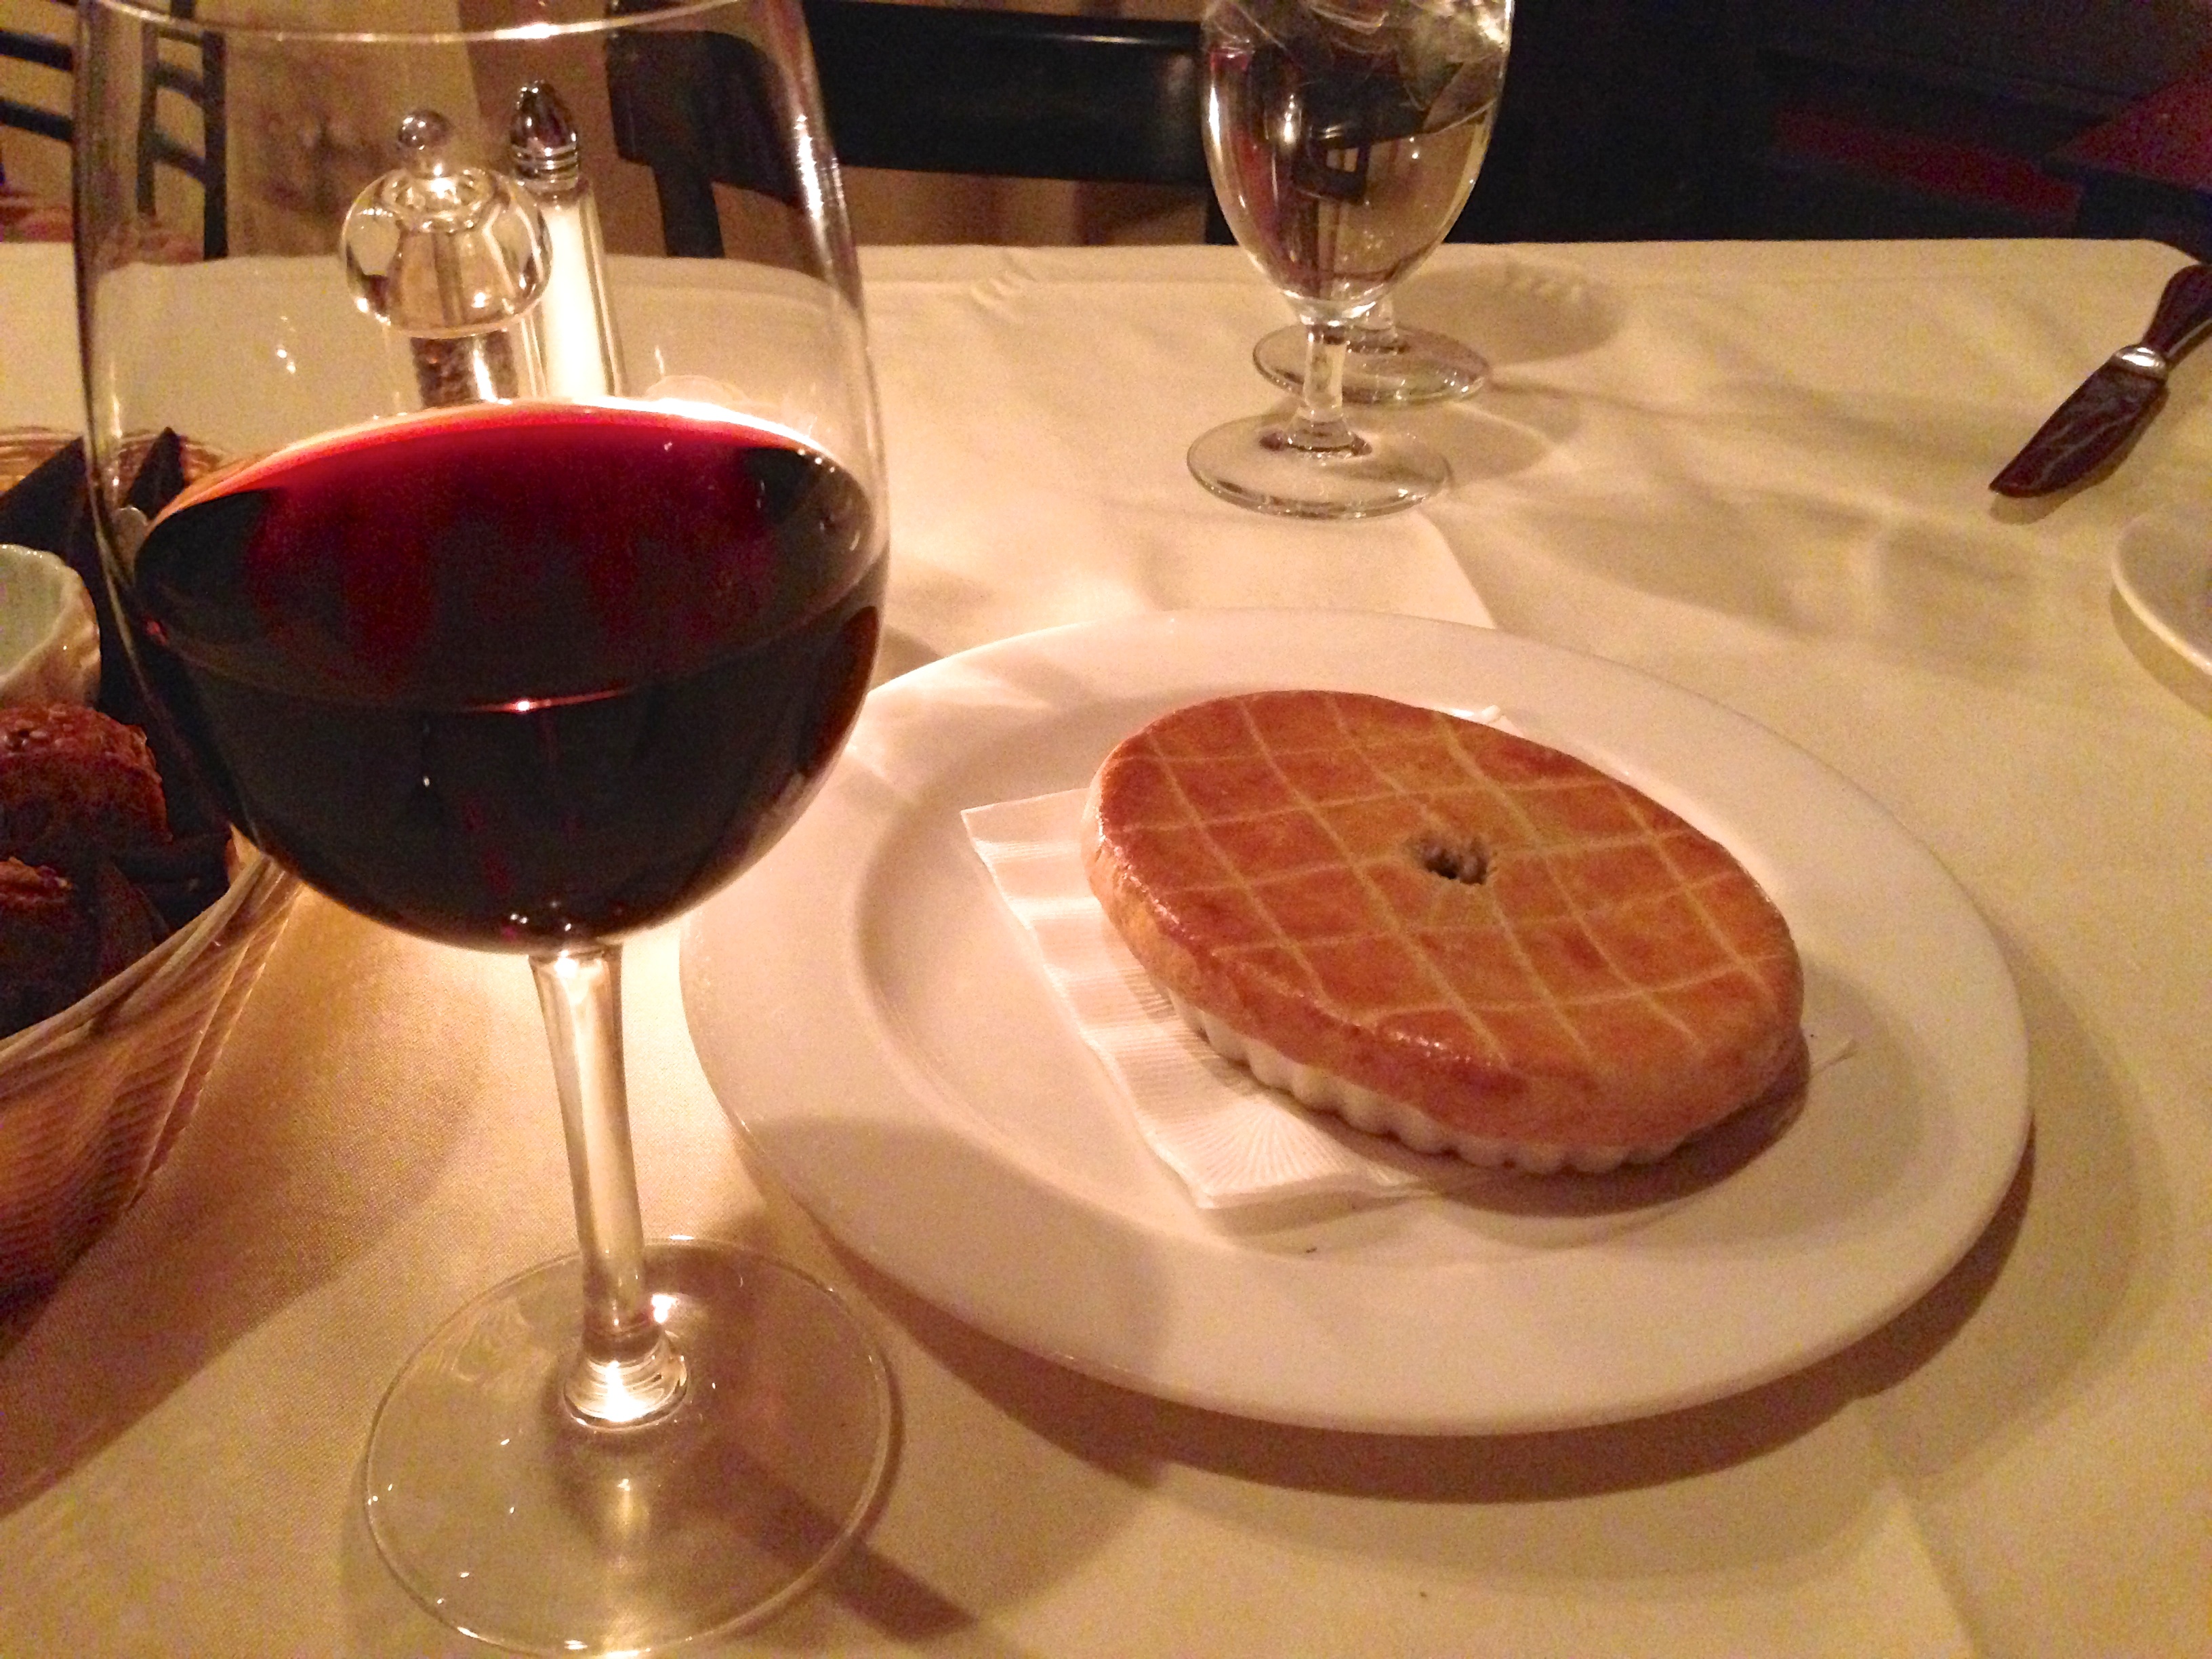
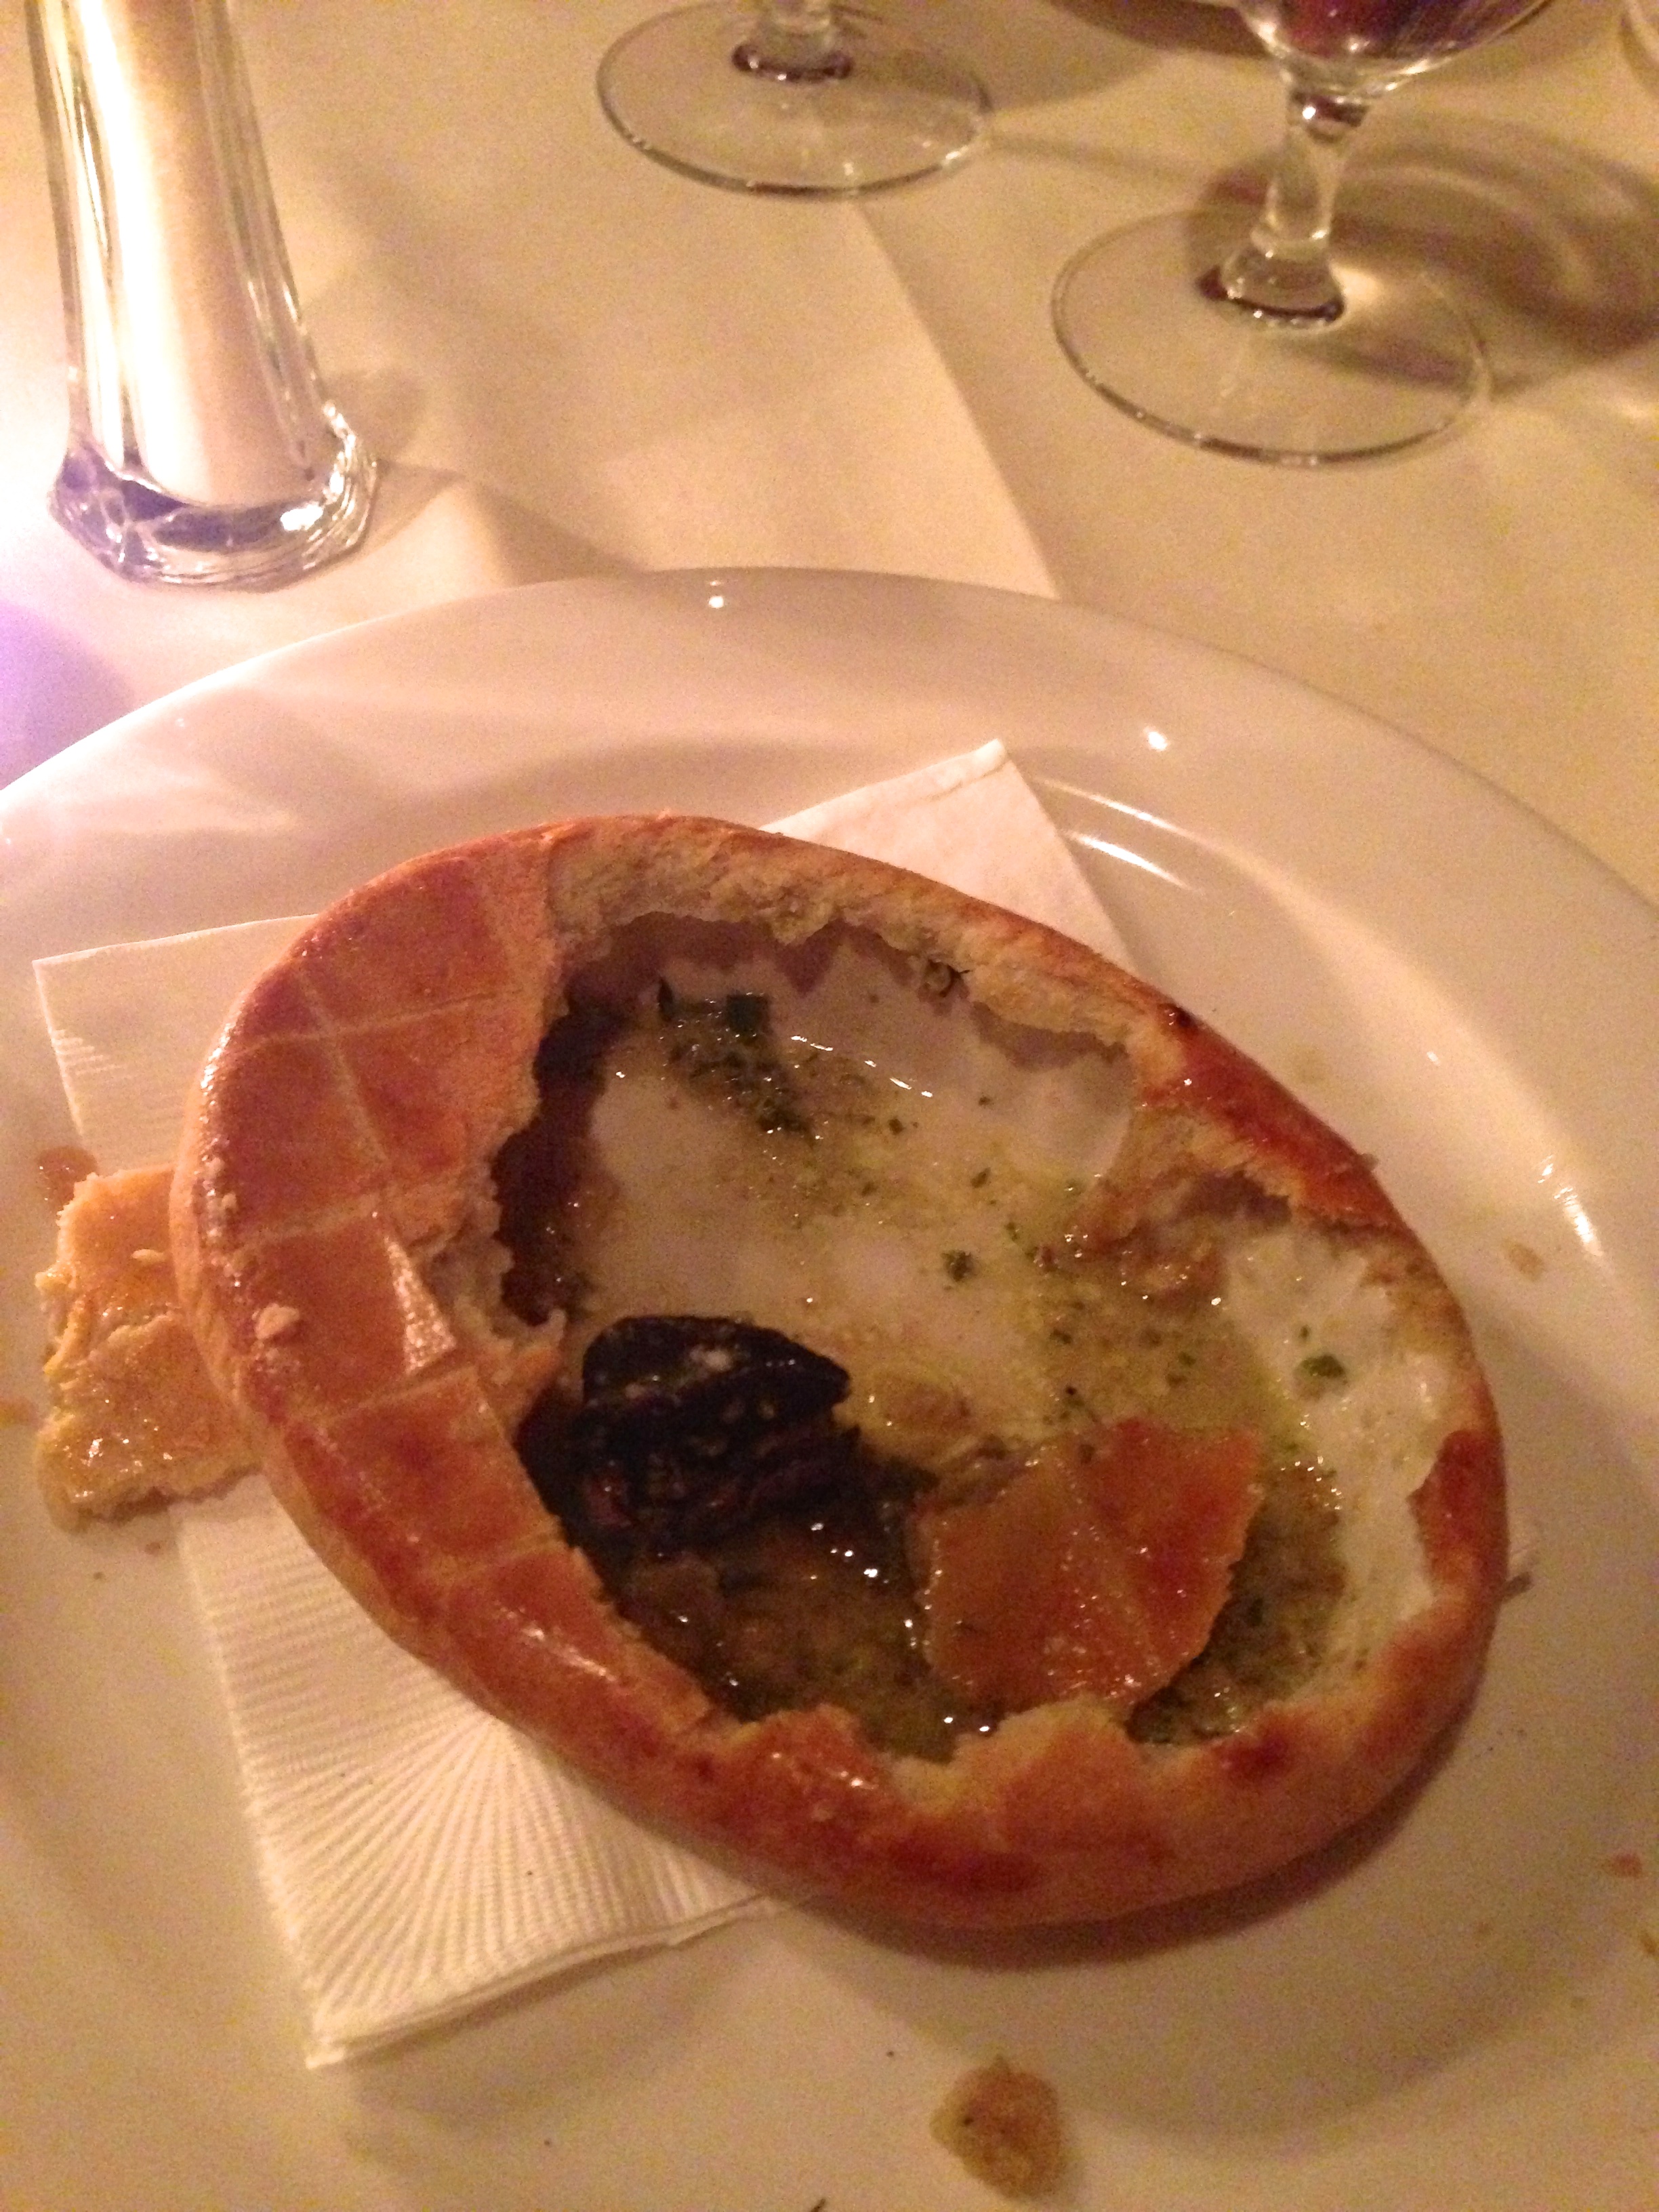
The Escargot en Croute, a classic French appetizer of snails with garlic and herb butter baked in pastry ($12.50), was also very tasty. It was my first experience with escargot and I expected to be leery about the texture, but the flakey and buttery croute provided enough contrast for me to enjoy them. Caution: there is a TON of garlic used in the making of this dish!

Escargot en Croute 2

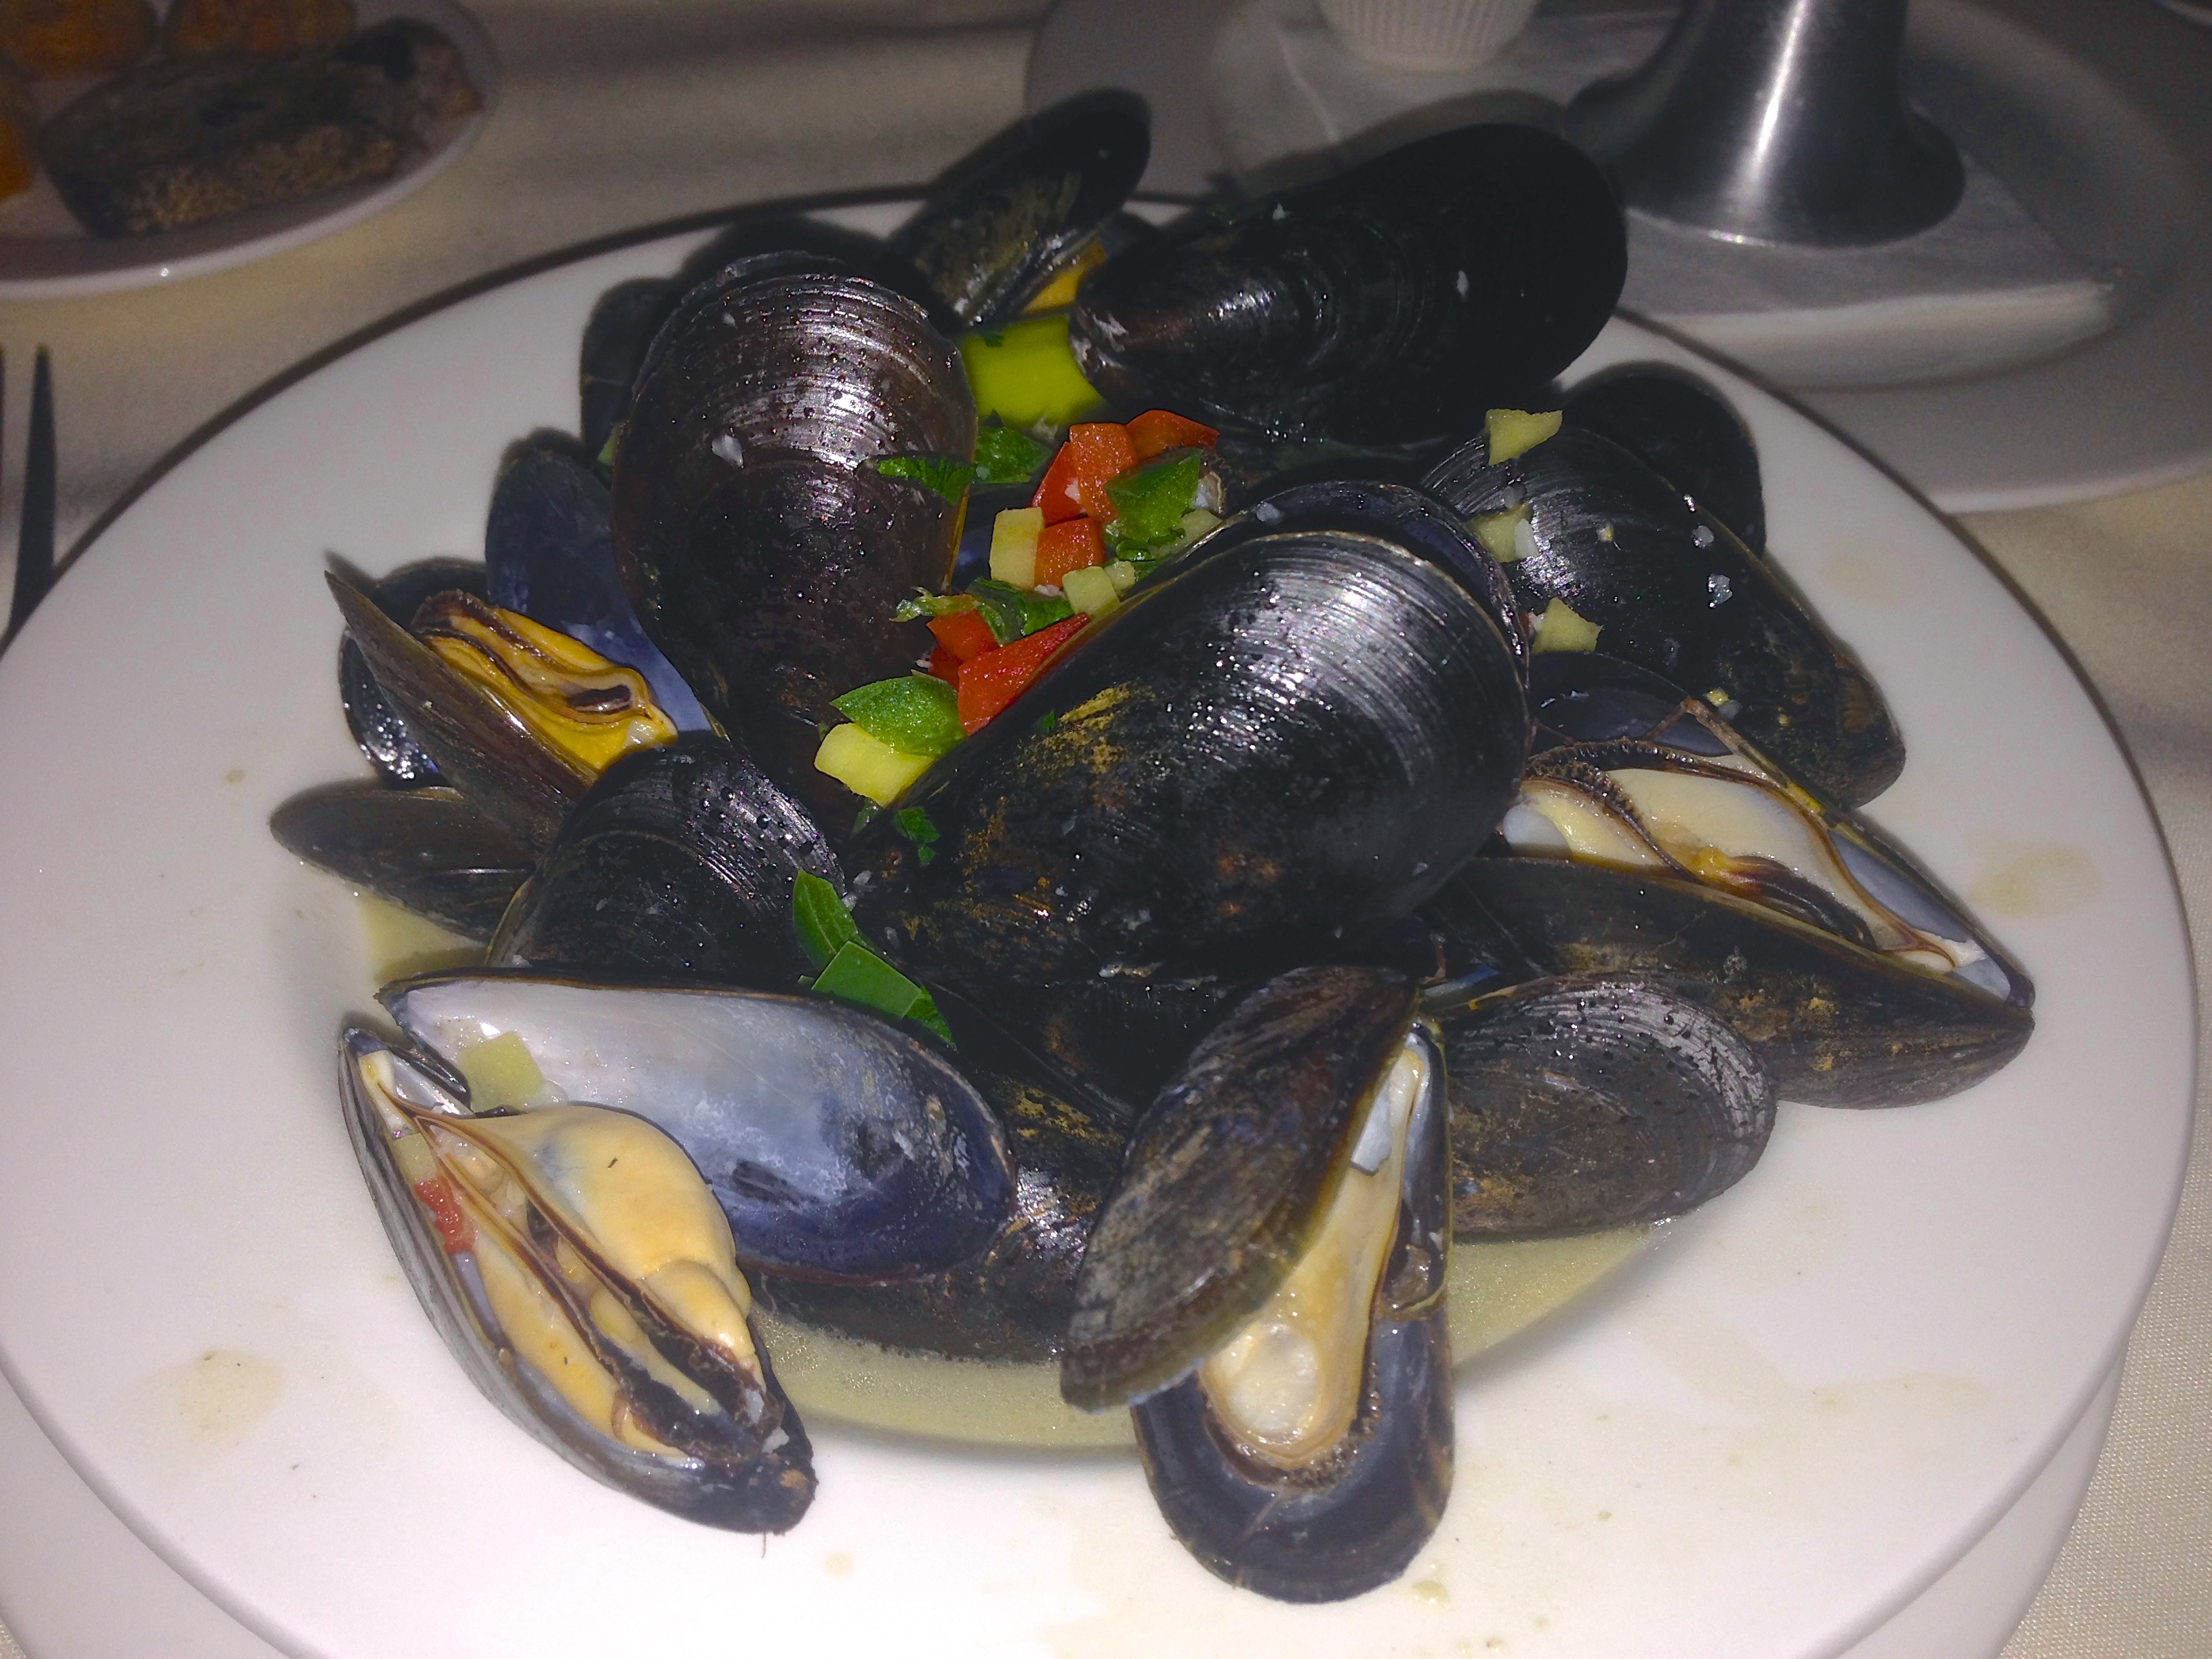
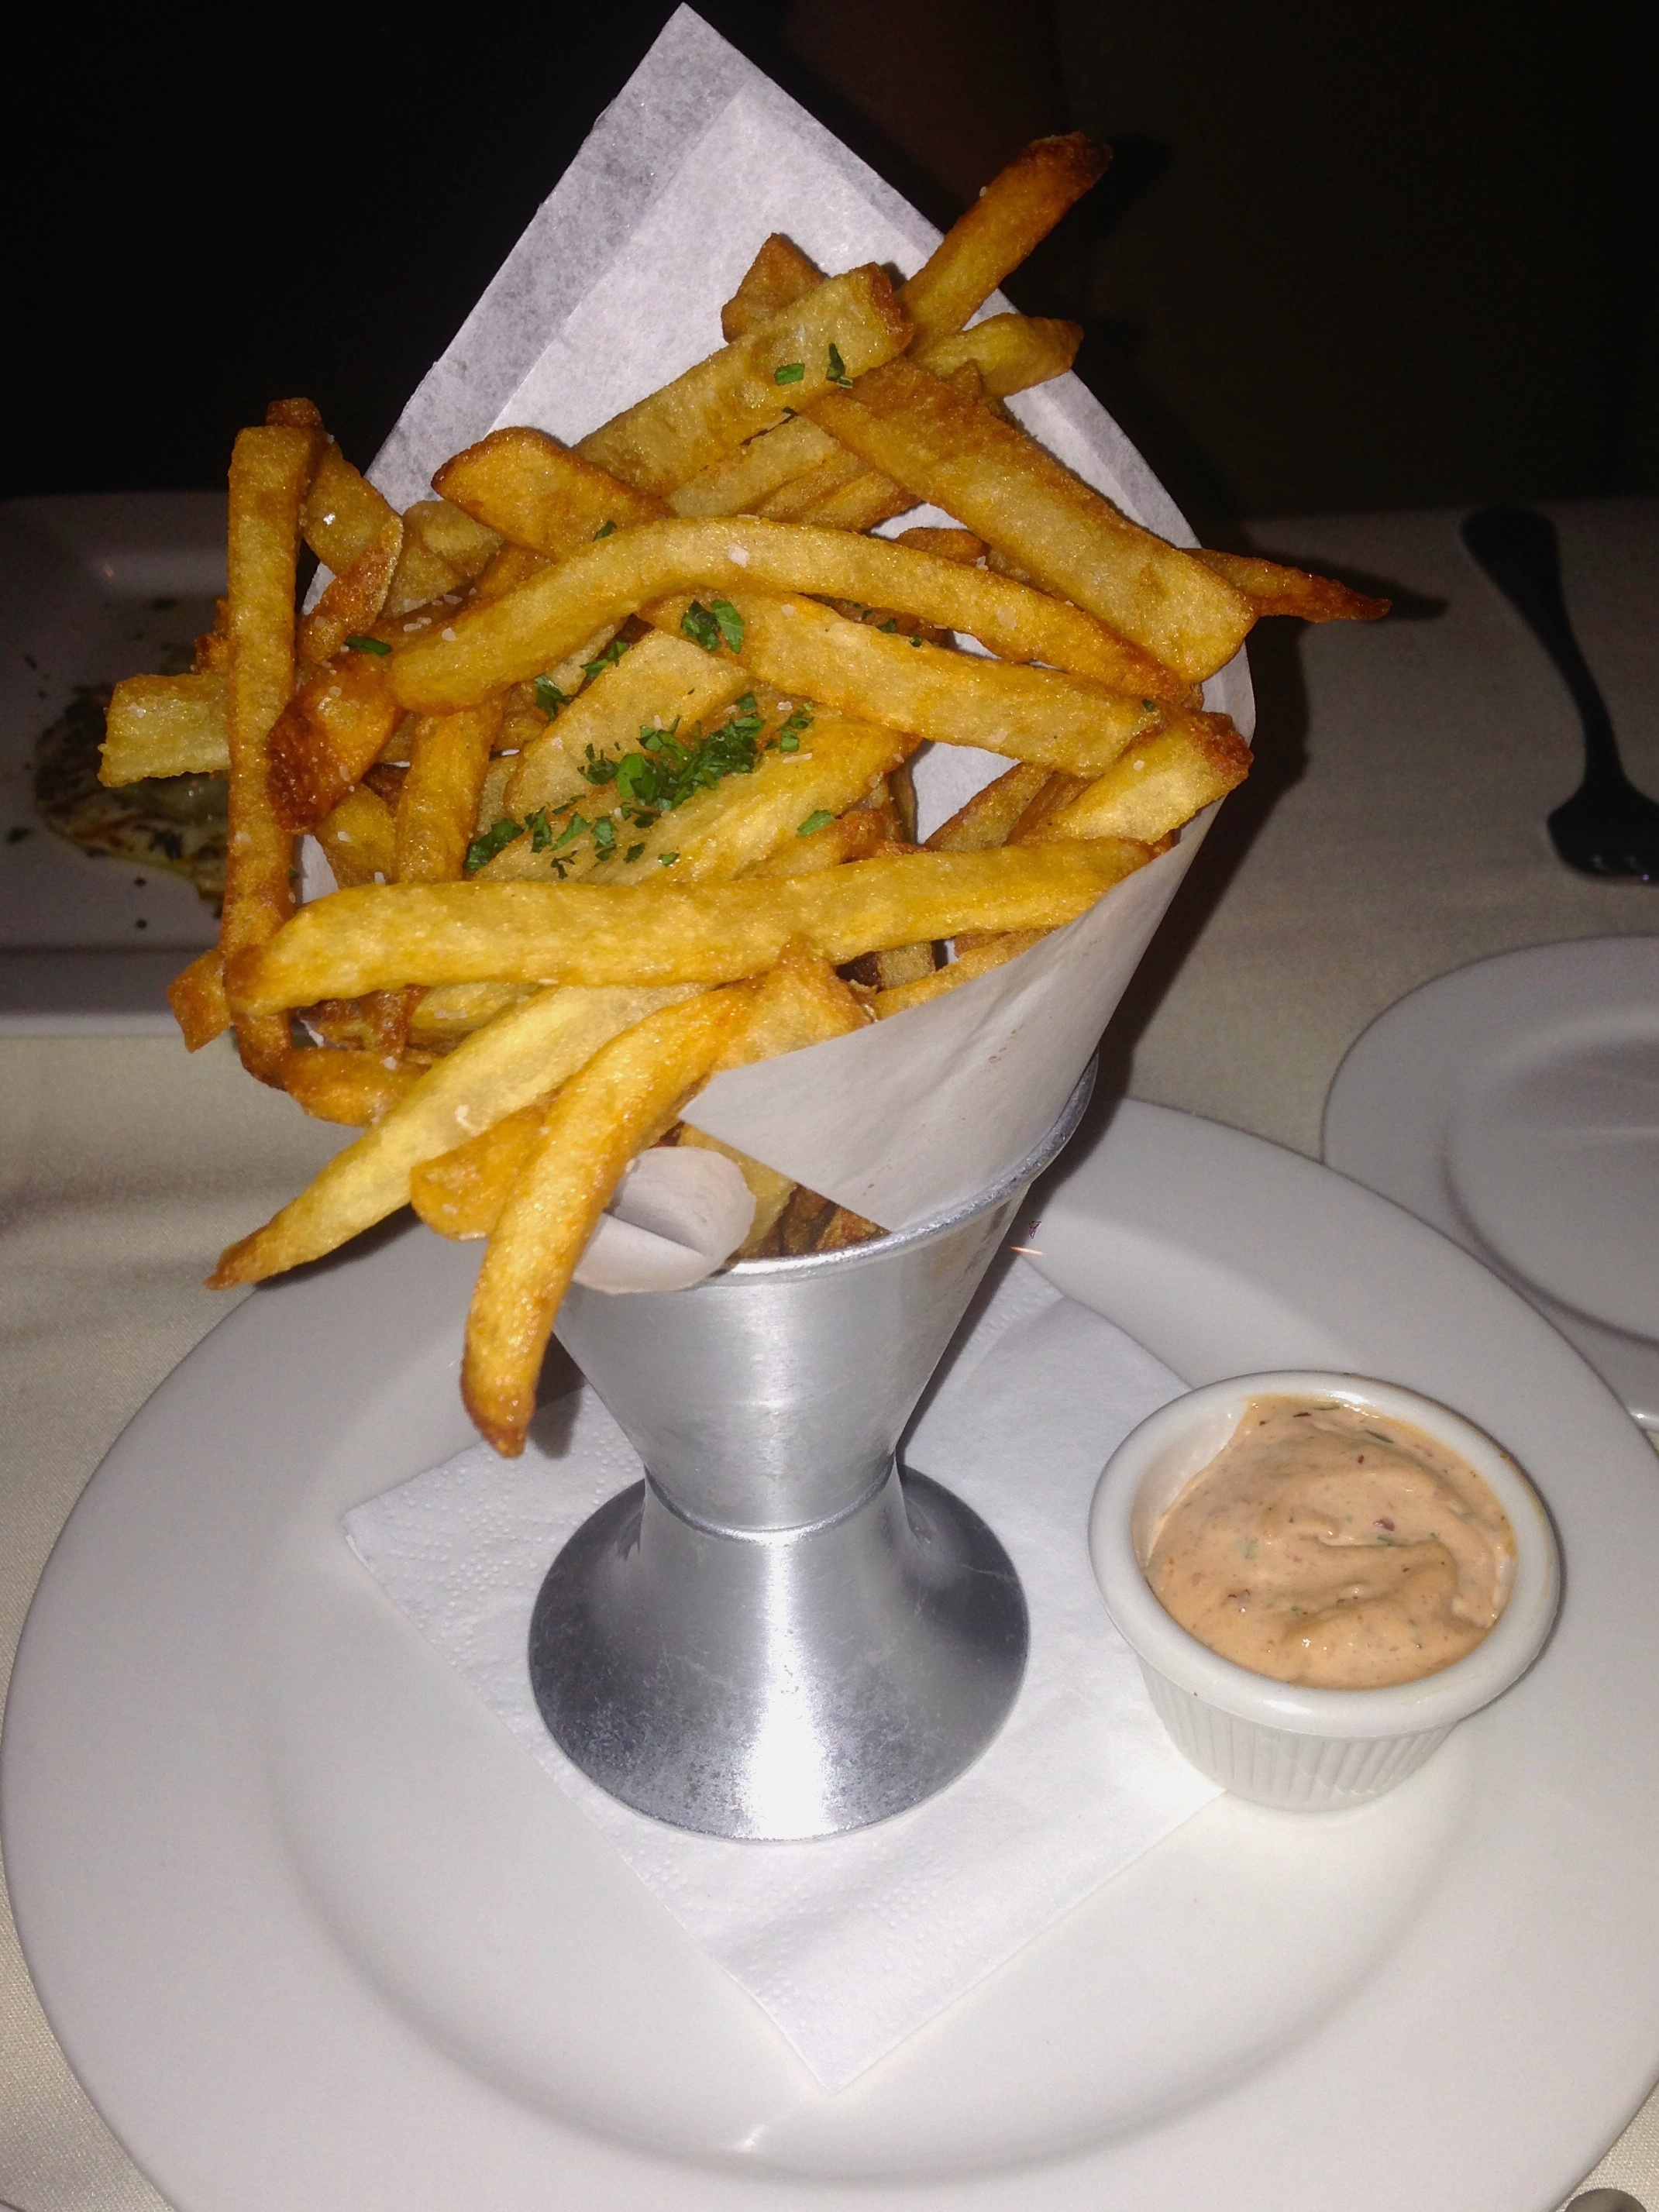
For dinner I ordered the Thai Steamed Mussels with coconut, ginger, and lemongrass with a side order of fries ($15.50). I found the broth bland because they used coconut water instead of coconut milk. I thought it was a bit too light without the creamy component, but the mussels themselves were nice and plump. The fries were also excellent!

IMG_3744

IMG_3746

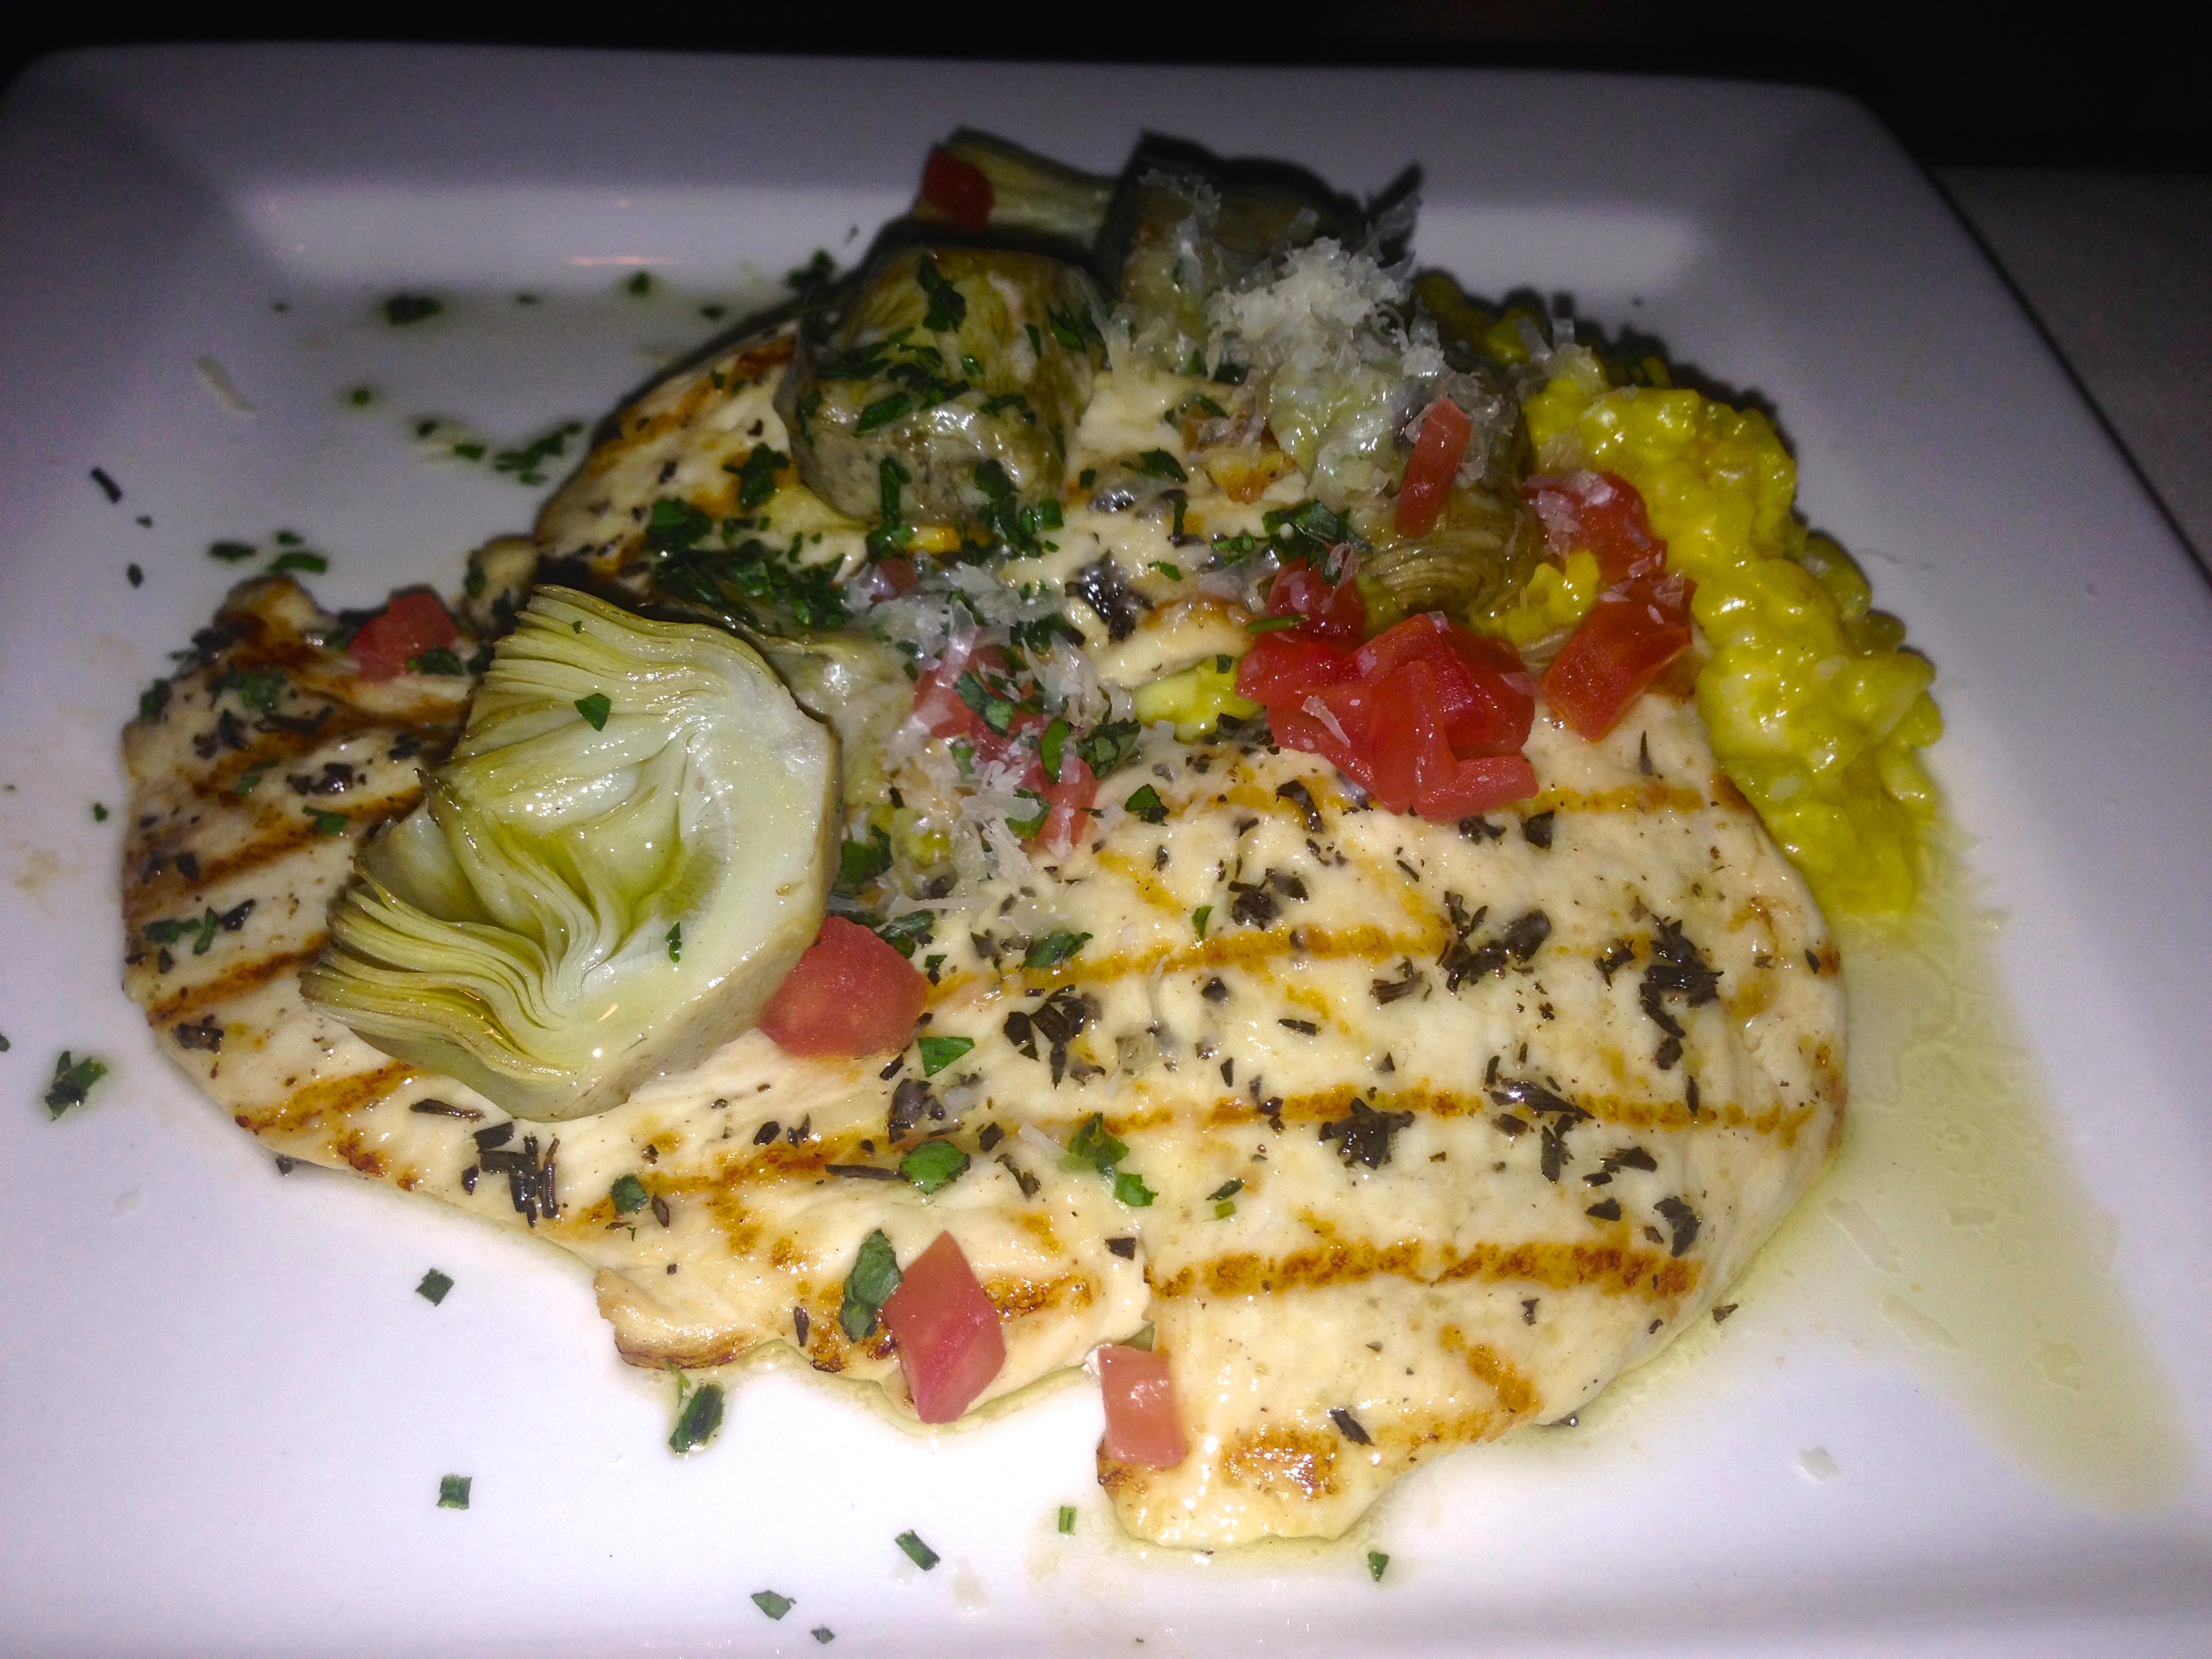
Liz had an order of the Chicken Paillarde with artichokes, nicoise olives, and saffron risotto ($14.50). She is a risotto kind of girl due to her gluten free diet, and she claims that this is the best risotto that she has ever had. As for the rest of the dish, chicken is chicken….

IMG_3745

Since my initial visit, I have gone back and tried the Bar Steak Au Poivre, which is a pepper encrusted petit NY steak served with fries ($20.50). I was terribly disappointed by the steak, which I requested at medium rare temp and was served more than well done. The piece of meat shrank down to nothing, but I was so hungry that I continued to eat after bringing it to my server’s attention. Unfortunately, they did nothing to rectify the situation, which I found to be a bit of a turn off and I certainly won’t suggest that anyone order a steak there. The French are infamous for under cooking their beef, so to be served so well done is a bit odd.

Steak Au Poivre

Overall, I like the idea of going back for a nice meal at the bar with a friend or on a date. Get a cocktail and either a cheese platter or one of the lighter menu items to share. I would try the mussels in traditional white wine garlic sauce next time, and steer clear of steak.

Leave a comment

Filed under Baking, Brunch, Buck's County, Cafe / Bistro, Cocktails, Dessert, French Restaurants, Gluten Free, Lunch Spots, Pennsylvania, Philadelphia Restaurants, Take-Out

{ The Down to Earth Cafe } ****

doc51dcb88dabf2a3853190365
1141 N 5th St
Perkasie, PA 18944
(215) 258-2233

CHECK OUT THE MENU!

Eating out at a restaurant is often an experience that is driven and dominated by the desire to socialize. People go out for a meal to spend time with the ones that they love, and the food serves as the unifying element that brings them all together. Sometimes the food is very well prepared and someone will comment on its palatability, and other times, the food is just present as a mere necessity for sustaining life and a backdrop for the conversation.

What I am trying to say is that very rarely do people make an emotional connection with their food when they dine out. After all, they are not involved in the direct preparation of their food, nor do they often get the opportunity to watch as chefs transform raw ingredients into the entrée of their choice. The food arrives at the table, they eat, and go home.

The Down to Earth Café in Perkasie Pa offers a different kind of dining experience though—one that is atypical of the norm. In all facets of the restaurant, there is a permeating sense of community; a genuine connection established between every person, object, and meal that one comes in contact with. The servers feel familiar and their smiles seem genuine, as if they would rather be nowhere else in the world. The kitchen is partially within the customer’s view so that patrons can watch as their food is being prepared, and see who is responsible for crafting their meal. The food itself is sourced locally and organically—whenever feasible—and the menu showcases how simple high-quality ingredients can come together to create something delicious.

6674883415_11e9bc43a6_b3

I went for brunch this weekend and had very few expectations for this little café tucked away in a rather non-descript and rundown strip mall. But from the moment that I walked in, I knew I was in for a good meal! I ordered the Anti-Salerno Sandwich with grilled eggplant, zucchini, asparagus, onions, mushrooms, and roasted red peppers, topped with melted goat cheese on a fresh ciabatta roll ($8.95).

Veggie Sandwich 2

I added a drizzle of balsamic vinegar and it was delightful! The veggies were chopped up nice and small so that each bite was clean, and the side of balsamic and grape quinoa salad was super tasty. I wish there had been a bit more than the level tablespoon that was dolloped on the plate, but it was excellent.

Veggie Sandwich 1

My boyfriend ordered the Farmer’s Panini Special with scrambled eggs, Blooming Glen scrapple, cheddar cheese, and baby spinach ($9.95). I am not one that cares for scrapple, so I did not sample his dish, but he said that it was hearty and delicious.

Scrapple Sandwich

To drink, I sampled one of the new Sipp organic sodas that they offered in the Mojo berry flavor with blackberry juice, mint, lime, and a touch of agave nectar. It was very refreshing and much less syrupy than a typical soda. Dare I say a healthy soda?

Menu and Soda

All in all, I cannot wait to go back and try some of the other fabulous meals offered at the Down to Earth Café…in particular the smoothies, which looked incredible!

Leave a comment

Filed under Bakery, Baking, Breakfast, Brunch, Buck's County, Cafe / Bistro, Coffee Shop, Cookies, Dessert, Fast Casual Food, Lunch Spots, Muffins, Pennsylvania, Philadelphia Restaurants

{ The Borough Market in London }

IMG_3127

Whenever I go into a city, I feel pressured to eat—and drink—just about everything in sight. In a brief two-block stroll, I can usually find time to eat a pastry, sample a gelato, snack on an over-priced French macaron or chocolate, down a cup of fancy coffee, and possibly even grab a cocktail of some sort. It’s down right impressive, albeit slightly sickening to my friends that are forced to dip into every corner shop café with me!

Why does the city send me into this preposterous food frenzy, you ask?

Because I am from the suburbs!! The suburbs of Philadelphia, no less: a place where good food requires some serious gas mileage and planning. You can’t find an authentic Italian restaurant, a crab shack, a sake lounge, and an artisanal chocolatier all within the same one-mile radius! If you want Indian, you drive to Iselin, NJ. If you want Italian, you drive to South Philly. If you want French, you’re shit outta luck. My point is, that you’re driving if you want to get good ethnic foods. So when I see Cambodian sandwiches, ramen, French pastries, and kebabs all within the same street, I get beside myself and feel the urge to try it all simply because it is there!

My most recent trip to London kept me eating around the clock because of the seemingly endless number of cafes and pubs, each one more adorable than the next. I plan to give a full review each meal, but I want to start off with my absolute favorite food experience in London, which doesn’t take place in a restaurant at all, but rather an open-air food market called the Borough Market.

My idea of heaven is an endless Borough Market where every vendor has free samples and they don’t judge you for taking more than one, instead they encourage it! The food is free, and it has no caloric value, and you never feel full so you can just keep on eating, and eating, and eating. #FatGirlProblems

The Best Prepared Meal Item: Thai Green Curry Paella with Chicken & Seafood over Rice. I did my research on the market before going (aka Googled the shit out it to see what other bloggers were saying!) in so that I could make an informed decision on what to eat once I got there. I read that the Paella place was one of the best, and I can confirm that it was better than some seafood dishes I had in Spain. It was creamy and flavorful and the rice was tender without being mushy. A food experience that was borderline otherworldly.

IMG_3004

IMG_2998

London-2012-Day-9-Borough-Market-26

The Best Cheese: The Borough Cheese Company’s 15 mo. aged Comte

It was the first cheese we sampled going into the market, and we continued to go back for more samples until we found ourselves just pounding down his entire platter one sample after another. Then it got awkward and we decided we were obligated to make a purchase, which was noshed down that same evening. I ate it like a slice of watermelon, right down to the rind, holding the wedge between my two hands.

IMG_3006

IMG_3007

The Best Exotic Item for Purchase: Tartufaia Truffles’ White Truffle Honey

Need I say more? Truffle + Honey = guaranteed foodgasm

I might just have to fly back for more once I eat it all, and for only 5 pound a jar, it is the best bargain in London!!!

IMG_1121

The Best Eat at Home Purchase: West Country Preserves

I bought the Spicy Gooseberry with Cumin Seeds, which is more savory than sweet. It pairs well with chicken and meat, but also toast if your taste buds are like mine! I also bought one of the Ginger Curds, which is a sweetened yet naturally spicy spread that pairs lovely with toast and desserts. My friends got the pure Ginger Preserves, which were intensely flavorful but also amazing. The man knows how to sell too—he loves encouraging samples! I think I tried all 32 varieties before selecting my final two for purchase.

IMG_2999 

IMG_3001

Other Items I purchased and loved:

 Fresh Buffalo Mozzarella – So creamy and tender. I coupled these bad boys with some sliced tomatoes and avocado wedges when I got back home and they were lovely.

Unknown-2

Date and Walnut Bread from The Flour Station– I was on a date kick after my trip to Harrods (where I bought the best dates of my life!), and so I decided to get loaf of this bread. It turned out to be my breakfast pregame and late night snack for the remaining days of my trip. A fabulous purchase!

borough-market-london-111

1 BOROUGH MARKET YUM

Roasted Porchetta Sandwich with Applesauce and Rockett on Ciabatta – this was not my favorite, as I found the meat a bit too fatty and difficult to swallow. That being said, I did love the deep rosemary flavor to the meat and the pairing of the sweet applesauce, which is something I will replicate at home in the future.

ADB13A58-F36B-4D8F-B0CD-9BB60E606A2B-7969-000003BB4A7315FD_zpseb37f280

IMG_3003

Mulled Wine – It was my first English mulled wine experience, so I will have a special place for it in my heart, but I went on to have much better from street vendors at the Winter Wonderland in Hyde Park. And priced at 4 pound a cup, it was difficult to catch a buzz!

borough-market-london-22

Chocolates and Fudge from Burnt Sugar– I loved the chocolate covered honeycombs made with rich dark chocolate, but learned that fudge is not really my thing. It might be the only food that I can say isn’t one of my weaknesses.

b2b9de935c23605324735202_original.

Leave a comment

Filed under Bakery, Baking, Breakfast, Brunch, Cocktails, Coffee Shop, Cookies, Dessert, International Restaurants, London Restaurants, Markets

{ Applesauce Multigrain Muffins }

IMG_2763

You know those suggested recipes posted on the side of food packaging? Well, this recipe hails from the side of a Trader Joe’s multigrain oatmeal box. I normally make my signature “flat belly bran muffins,” but I was in the mood to try something new and this recipe seemed straightforward and delicious!

multigrain-hot-cereal

 I followed the recipe on the box exactly as printed, and enjoyed the flavor and texture, but I would definitely amp them up next time by throwing in some chopped walnuts and raisins. The muffins tasted best right out of the oven and topped with a little bit of Greek yogurt, but they did not stay fresh very long so eat them up quickly or freeze them!

This recipe makes a much softer muffin than my flat belly bran recipe, but it begs for some fruit and nut pieces for added texture.

IMG_2762

{Streusel Topping Ingredients}

  • 1/3 cup Country Choice Multigrain Hot Cereal (uncooked)
  • 2 tablespoons organic brown sugar
  • 1 tablespoon butter, melted
  • ½ teaspoon ground cinnamon

{Muffin Ingredients}

  • 1 cup Country Choice Multigrain Hot Cereal (uncooked)
  • 1 ½ cups flour
  • 1 teaspoon baking powder
  • ½ teaspoon baking soda
  • ½ teaspoon ground cinnamon
  • 1 cup unsweetened applesauce (I used Trader Joes)
  • ½ cup fat free milk
  • ½ cup organic brown sugar
  • ¼ cup sunflower oil
  • 1 egg

 {To Make the Muffins}

Preheat the oven to 400 degrees. Line 12 muffin cups with paper liners.

Prepare the streusel topping by combining the oats, brown sugar, and cinnamon. Then add the melted butter and mix well.

Prepare muffins by combining oats, flour, baking powder, baking soda, and cinnamon in a large bow: mix well. In a separate bowl, mix together the applesauce, ilk, brown sugar, oil, and egg. Add to the dry ingredients and stir just until the dry ingredients are moistened.

Bake for 18-20 minutes. Remove from oven. Serve warm*

*We served ours with homemade peach jam!

IMG_2759

1 Comment

Filed under Baking, Breakfast, Brunch, Cakes, Muffins, Recipes

{ Thanksgiving Pizza }

IMG_2680

I consider sage to be the dominant flavor of Thanksgiving. My mom and I use it in just about every dish, from our roasted butternut squash, to our stuffing, and our delicious turkey butter baste! So when a customer at my restaurant requested that I come up with a recipe for a Thanksgiving-inspired pizza special, I knew sage would be the foundational building block of the pie.

The savory, and slightly peppery, flavor of sage lends itself well with just about any ingredient but since I needed to construct a pie that tasted like Thanksgiving, I decided to pair it with butternut squash, caramelized onions, and cranberry sauce. Instead of using just mozzarella, I opted to add brie cheese which is a soft French cheese made from cow’s milk. The creamy cheese melts very easily when baked and the sweetness of the cheese lends itself well with the tartness of the cranberry sauce.

I have served this pizza to several taste-testers thus far, and each of them have said the same thing…”tastes like Thanksgiving!”

I consider that mission accomplished.

{ Ingredients }

  • One pizza crust — I use this recipe by Peter Reinhart
  • 1 can whole berry cranberry sauce
  • 1 butternut squash, roasted, peeled, and cubed
  • 1 wedge brie cheese
  • 1 cup shredded mozzarella
  • 1 spanish onion, sliced, and caramelized
  • 1 bunch fresh sage leave, chopped

{ To Make the Pizza }

Preheat the oven to 450 degrees.

Using a spatula, spread the cranberry sauce over the prepared pie crust to the outer edges. Lightly sprinkle the shredded mozzarella cheese over the cranberry sauce. Thinly slice the brie cheese and place slices onto the pie a few inches apart from each other.

Top the cheese with the caramelized onion and the cubed butternut squash.

Bake for about 10 minutes, or until the edges turn a golden brown and the crust is crispy.

Sprinkle with the chopped sage and serve!

IMG_2677

Leave a comment

Filed under Baking, Brunch, Holiday Recipes, Recipes

{ Italian Florentine Cookies }

Florentine

Last week I blogged my recipe for Italian seven-layer cookies, and this week I am sharing my recipe for another classic Italian Christmas cookie: Almond Florentines. Also known as lace cookies, Florentines are an extremely delicate, paper-thin cookie made of macerated almonds and orange zest. They are crunchy and sweet, and with the chocolate drizzle on top–optional in this recipe, but a must for me!–they are absolutely decadent.

I like to make these for the holidays because other people so often gravitate towards making softer dough cookies like sugar cookies, spritz cookies, and snickerdoodles. Baking something with a little crunch factor helps to set you apart from the other women at the neighborhood cookie exchange!

{ Ingredients }

  • 1 3/4 cups sliced, blanched almonds (about 5 ounces)
  • 3 tablespoons all-purpose flour
  • Finely grated zest of 1 orange (about 2 tablespoons)
  • 1/4 teaspoon fine salt
  • 3/4 cup sugar
  • 2 tablespoons heavy cream
  • 2 tablespoons light corn syrup
  • 5 tablespoons unsalted butter
  • 1/2 teaspoon pure vanilla extract

Chocolate Topping, optional:

  • 2 to 4 ounces semisweet chocolate, chopped

{ To Make the Italian Florentine Cookies }

Position a rack in the center of the oven and preheat to 350 degrees. Line a baking sheet with parchment paper.

Pulse the almonds in a food processor until finely chopped, but not pasty. Stir together the nuts, flour, orange zest, and salt in a large mixing bowl.

Put the sugar, cream, corn syrup, and butter in a small saucepan. Cook over medium heat, stirring occasionally, until mixture comes to a rolling boil and sugar is completely dissolved. Continue to boil for 1 minute. Remove from heat and stir in the vanilla, then pour mixture into almond mixture and stir just to combine. Set aside until cool enough to handle, approx. 30 minutes.

Scoop rounded teaspoons (for 3-inch cookies) or rounded tablespoons (for 6-inch cookies) of batter and roll into balls. Place on prepared baking sheet, leaving about 3 to 4 inches between each cookie since they spread (and trust me, they do!!!).

Bake 1 pan at a time, until the cookies are thin and an even golden brown color throughout, rotating pans halfway through baking time, about 10 to 11 minutes. Cool on baking sheet for 5 minutes, then transfer to racks to cool. Repeat with remaining batter. Serve.

{ MUST HAVE  Chocolate Topping Drizzle }

Set up a classic double broiler system by putting the chocolate in a medium heatproof bowl. Then bring a saucepan filled with 1 inch or so of water to a very low simmer; set the bowl of chocolate over the saucepan so that it is just above, but not touching, the water. Stir the chocolate occasionally until melted and smooth.

Chocolate in a double boiler

Drizzle melted chocolate over Florentines as desired. Set aside at room temperature until chocolate is set.

Florentine-Cookies-40-1024x871

**Store baked cookies carefully, separated by parchment or waxed paper, in an air-tight container for up to 3 days. Florentines are best stored separated from moist cookies and cakes.

IMG_0444

Leave a comment

Filed under Baking, Cookies, Dessert, Recipes

{ Italian Seven Layer Cookies }

IMG_0474edited

I come from a long lineage of family bakers. Cream and sugar are literally coded in my DNA.

And when I was growing up, the holidays signified one thing: cookie season! I would come home from school and my mom would have magazine clippings for cookie recipes that she wanted to try out at one of her infamous cookie exchanges. Given that it was not warm enough to play outside, she would encourage my sister and I to help her sift the flour, roll out the dough, and dip/glaze/sprinkle the tops of cookies in an effort to keep us from turning on the television (or the ‘boob-tube’ as it was referred to in my house!). Of course, we were always more more than happy to oblige!

We would make dozens of spritz cookies, sugar cookies, gingerbread cookies, chocolate chip cookies, pecan tassies, mixed nut turtles, and traditional Hungarian kiffles. But the one cookie we never made, was ironically the one that was my favorite–the Italian seven layer cookie.

Whenever I would spot these in a party tray assortment, I would pick them out, stuff them in a napkin, and then scurry away to eat them by my lonesome. I was–and still am–an Italian cookie fein and hoarder.

This year, I decided to make my own seven layer cookies using the recipe printed in Gourmet, December 2005, and since them endorsed by The Smitten Kitchen food blog. I will admit that they were quite laborious and involved to make, but since they can be frozen in large blocks, I will have them to enjoy/gift over the next few months (or weeks, depending on my level of self-control!).

3114755998_69d8f2f352

{ Ingredients }

  • 4 large eggs, separated
  • 1 cup granulated sugar
  • 1 (8 oz) can of almond paste
  • 2 1/2 sticks of unsalted butter, softened
  • 1 teaspoon almond extract
  • 2 cups all purpose flour
  • 1/2 teaspoon salt
  • 25 drops red food coloring
  • 25 drops green food coloring
  • 1 (12 oz) jar of apricot preserves, heated and strained
  • 7 oz of good-quality bittersweet chocolate (not unsweetened), roughly chopped

{ To Make Italian 7-layer Cookies }

Place oven rack in middle position and preheat oven to 350°F. Butter a 13- by 9-inch baking pan and line bottom with wax paper, leaving a 2-inch overhang on two of the ends, then butter paper.

Beat egg whites in mixer fitted with whisk attachment at medium-high speed until they just hold stiff peaks. Add 1/4 cup sugar a little at a time, beating at high speed until whites hold stiff, slightly glossy peaks. Transfer to another bowl.

Switch to paddle attachment, then beat together almond paste and remaining 3/4 cup sugar until well blended, about 3 minutes. Add butter and beat until pale and fluffy, about 3 minutes. Add egg yolks and almond extract and beat until well combined, about 2 minutes. Reduce speed to low, then add flour and salt and mix until just combined.

Fold half of egg white mixture into almond mixture to lighten, then fold in remaining whites gently but thoroughly.

Divide batter among 3 bowls. Stir red food coloring into one and green food coloring into another, leaving the third batch plain. Set the white batter aside. Cover the green batter with plastic wrap and chill in fridge.  Pour the red batter into the prepared pan and spread evenly with offset spatula (layer will be about 1/4 inch thick).

Bake red layer 8 to 10 minutes, until just set. (It is important to undercook. They’ll look like they’re not done, but a tester does come out clean.)

Using the paper overhang, transfer the layer to a rack to cool, about 15 minutes. Clean pan, then line with parchment or wax paper and butter paper in same manner as above. Bake white layer in prepared pan until just set. As white layer bakes, bring green batter to room temperature. Transfer white layer to a rack. Prepare pan as above, then bake green layer in same manner as before. Transfer to a rack to cool (see note #1).

When all layers are cool, invert green layer onto a parchment or wax-paper-lined baking sheet. Discard paper from layer and spread half of the apricot preserves on top. Invert white layer on top of green layer, discarding paper. Spread with remaining apricot preserves. Finally, invert the red layer on top of white layer and discard wax or parchment paper (see note #2).

3111716910_857db7beb1_m

Cover entire “layer-cake” with plastic wrap and weight down with a large baking pan (I stacked cook books on mine for extra weight!). Chill for at least 8 hours. BE PATIENT!

3110888019_5cedcfe6d8_m

Remove weight and plastic wrap. Bring layers to room temperature. Melt chocolate in a double boiler or a metal bowl set over a saucepan of barely simmering water, stirring until smooth. Remove from heat. Keep chocolate over the hot water.

Trim edges of assembled layers with a long serrated knife so they are clean lines. Quickly spread half of chocolate in a thin layer on top of cake. Chill, uncovered, until chocolate is firm, about 15 minutes. Cover with another sheet of wax paper and place another baking sheet on top, then invert cake onto sheet and remove paper. Quickly spread with remaining chocolate. Chill until firm, about 30 minutes.

Cut lengthwise into desired number of strips, depending on the size and number of cookies that you want to yield. I cut mine into 10 I believe.   Cut strips crosswise into 3/4-inch-wide cookies  (see note #3).

**Do ahead: Cookies keep, layered between sheets of wax paper or parchment, in an airtight container at room temperature 2 weeks. They’ll keep even longer in the freezer.

Three important notes:

Note #1Don’t stack the cakes during the cooling process: Not because they crush each other (they won’t) or because they’ll stick (they don’t), but because that paper liner is greased on both sides from baking and the chocolate shell won’t quite stick right to exterior of the red layer because of the grease accidentally left on it.

Note #2Be careful dividing your jam: If there is too much jam between one of the layers, it will ooze out when you cut the cake with a serrated knife. Sadly, the cookie will fall apart.

Note #3They’re easier to cut when frozen: Nevertheless, they tasted amazingly and I was all ready to do a victory lap around my wee kitchen counter, however, when I got to cutting them up and then it all went south. People, these were trying to cut. The problem lies within the differing textures of the layers — the top hard chocolate shell more benefits from a sharp serrated knife (a regular, even very sharp knife will crack the edges when you press down on it), the same serrated knife that gets gummed with jam and tries to pull the soft cake layers in between apart. It was exasperating. It didn’t go well. I packed up some for a party and stuffed the rest in the freezer, only to discover the next day that these cut fantastically when frozen. Seriously. Trust me. I have the gummy floor and gray hairs to prove it.

3114754008_186ca63709

5 Comments

Filed under Baking, Cookies, Dessert, Holiday Recipes, Recipes

Felix’s Caketeria ****

Cupcake Assortment

Cupcakes became sort of food craze over the past couple of years, with several “cutesy” bakeshops opening up all over the country in a very short period of time. But but very few of these bake shops have managed to survive into 2013 because their ridiculously over-priced, miniature offerings, were just trendy items and not actually quality desserts. Felix’s Caketeria on the other hand, is going strong and even expanding because they are a phenomenal bakery that has mastered the art of exquisite cakes. Fortunately, for consumers like myself, they offer their indulgent cakes in miniature sizes (dare I call them cupcakes?!) to be enjoyed on days that aren’t specialty occasions. No birthday, no problem!

Doesn’t mean you can’t sneak a cupcake on your lunch break!

Cupcake Display

My personal favorite is the Chocolate Salty Caramel, which is a chocolate cake filled with salty caramel, topped with chocolate buttercream and a caramel drizzle. 

Chocolate Salted Caramel

I also love the traditional Carrot Cake, which is made with pineapple, coconut, pecans and topped with a cream cheese icing. 

Carrot Cupcake

The only thing that you must remember is that Felix’s Caketeria uses REAL buttercream to frost their cupcakes, so the cupcake MUST be brought up to room temperature before they are enjoyed. If your impatience gets the best of you, you will be eating a rock hard cupcake and you won’t get the most of your miniature cake experience.

Ohh, and one last cupcake special that they occasionally have is the Eclair Cupcake, shown below:

Eclair Cupcake

Leave a comment

Filed under Bakery, Baking, Cafe / Bistro, Philadelphia Restaurants

{ Chocolate Chip Cookie Throwdown! }

Jacques Torres Chocolate Chip Cookie
When The New York Times published the recipe for their favorite chocolate chip cookie, shit hit the fan…..in the food blogging world, at least!  It was like everyone instantaneously took out their kitchen aid mixers and got to baking and blogging. Post after post on my RSS feed featured reviews commenting on the cookie’s flavor, texture, and composition. Bakers and cookie connoisseurs alike disputed in blog columns whether or not this recipe was actually the best, and then offered their comments/suggestions to make it even better. With all this sugary hype, I  knew that I would just have to try the recipe out for myself. And being the type A, OCD freak that I am, I decided that I would also give a go at two of the other recipes suggested as contenders for the title of best chocolate chip cookie: (1) Jacques Torres’ Original Chocolate Chip Cookie Recipe & (2) blogger, “Will Bake for Tattoos'” Chocolate Chip Cookie Recipe.
Chocolate Chip Cookie Batches
So with three types of freshly baked chocolate chip cookies before me, which cookie recipe proved victorious?!?
Cookies Baked
Jacques Torres Chocolate
The New York Times recipe (#1 on the baking sheet) is a modified version of this classic (and it was a close second place), but the texture was uniform throughout the cookie. I liked that Jacques’ recipe  (#2 on the baking sheet!) had a crispier edge with a softer/chewier center.
NY Times Choc. Chip
The “Will Bake for Tattoos'” Recipe (#3 on the baking sheet) was far too commercial tasting in my opinion; it had a very “cakey” texture as opposed to a chewy texture, and the sugar in the cookie never caramelized to create a golden rim around the edge.
Will Bake for Tattoos
One thing that I did for all of the cookies, was allow them to chill in the refrigerator over night. The New York Times published an article in 2008, stating that the secret to a perfect chocolate chip cookie was to let it chill for a minimum of 24 hours, and ideally for 36 hours! I made sure to plan ahead (a rarity), and prepared my dough 24 hours in advance of baking to get the maximum quality out of the doughs.
Without further ado, here is the recipe for Jacques Torres Chocolate Chip Cookies:

{ Ingredients }

  • 1 pound unsalted butter
  • 1 3/4 cups granulated sugar
  • 2 1/4 cups packed light-brown sugar
  • 4 large eggs
  • 3 cups plus 2 tablespoons pastry flour
  • 3 cups bread flour
  • 1 tablespoon salt
  • 2 teaspoons baking powder
  • 2 teaspoons baking soda
  • 1 tablespoon pure vanilla extract
  • 2 pounds bittersweet chocolate, coarsely chopped

{ Directions }

Preheat oven to 350 degrees. Line baking sheets with parchment paper or nonstick baking mats; set aside.

In the bowl of an electric mixer fitted with the paddle attachment, cream together the butter and sugars.

Add the eggs, one at a time, mixing well after each addition.

Reduce the speed to low and add both flours, baking powder, baking soda, vanilla, and chocolate; mix until well combined.

Using a 4-ounce ice cream scoop, drop the cookie dough onto the prepared baking sheets, about 2 inches apart.

Bake until lightly browned, but still soft, about 20 minutes.

Cool slightly on baking sheets before transferring to a wire rack to cool completely.

3 Comments

Filed under Baking, Recipes

{ Cranberry Walnut Celebration Bread }

Thanks to Ms. Hurricane Sandy, I had an unexpected day off of work today! And that means my my oven was set at a comfortable 350 degrees with a constant rotation of breads, cakes, and cookies going though it’s doors. Four loaves of banana bread, and 2 dozen chocolate chip cookies later….I was ready to attempt a more complicated bread recipe from Peter Reinhart’s cookbook, “The Bakers Apprentice.” I haven’t done much bread baking before, but I was feeling up to the challenge with all of the free time on my hands!

The original recipe calls for a mixture of cranberries and walnuts, but I was running low on berries so I also threw in some golden raisins and dried currants. If a panettone and a babka had a love child, this bread would be it! Everyone in my family agreed that it will be made on Christmas morning for many more generations to come…aka, the bread turned out incredible!

So without further ado, here is my recipe for Kendall’s Christmas Celebration Bread, adapted from Peter Reinhart’s Cranberry-Walnut Celebration Bread in “The Baker’s Apprentice.”

{ Ingredients}

  • 3 cups of bread flour
  • 3 tablespoons granulated sugar
  • 3/4 teaspoon salt
  • 3 1/2 teaspoons instant yeast
  • 1 1/5 tablespoons lemon extract
  • 2 large eggs
  • 1/2 cup of buttermilk, at room temperature
  • 2 tablespoons unsalted butter, melted
  • 1/4 cup of water, at room temperature
  • 1 cup dried sweetened cranberries
  • 1/4 cup golden raisins
  • 1/4 cup dried currants
  • 3/4 cup coarsely chopped walnuts

{ To Make the Bread }

In the bowl of an electric mixer fitted with a paddle attachment, combine all of the ingredients (except the dried fruits and nuts) to make a soft dough. Switch the attachment to a dough kneading hook and knead for 5 minutes.

The dough should clear the sides of the mixing bowl, but remain tacky to the bottom. Adjust the concentrations of water and flour so that the dough takes this form.

Add the cranberries, raisins, and currants and continue to knead by hand for an additional 2 minutes.

Then add the chopped walnuts and knead by hand until the nuts are evenly distributed.

Transfer the dough to a well oiled bowl and allow to ferment, uncovered, at room temperature for 2 hours. The dough should almost double in size!

Transfer the dough a counter top surface and divide into 6 pieces; 3 larger pieces and 3 smaller pieces. Roll out all 6 pieces by hand into long strands. Braid the 3 larger strands using the 3-braid technique and then do the same with the 3 smaller strands.

Place the large braid on a baking sheet lined with parchment paper and then place the smaller braid directly on top of it. Brush the entire bread with an egg wash (1 egg beaten with 1 tablespoon milk) and allow to sit at room temperature for another 2 hours.

The braided bread should double in size. Brush the entire bread with egg wash a second time.

Bake at 325 degrees for approximately 25 minutes, or until golden brown on top. Remove from oven and allow to cool completely before serving.

I like to serve mine with a flavorful homemade butter. Recipe, below:

{ Homemade Sweet Orange Butter }

  • 1 1/2 cups of heavy whipping cream
  • 1 tablespoon Maple Syrup
  • 1 teaspoon orange zest
  • 1/2 teaspoon vanilla extract
  • Pinch of salt

{ To Make the Butter }

Combine all ingredient in the bowl of an electric mixer, and whisk on a medium-high speed until well combined and buttery in texture.

2 Comments

Filed under Baking, Recipes